https://docs.unity3d.com/Packages/com.unity.shadergraph@17.0/manual/Shader-Graph-Window.html
Shader Graph Window
Description
Shader Graph Window에는Shader Graph 시스템을 사용하여 셰이더를 생성하는 작업 공간이 포함되어 있습니다.
The Shader Graph Window contains the workspace for creating shaders using the Shader Graph system.
Shader Graph Window을 열려면 먼저 Shader Graph Asset을 생성해야 합니다. 자세한 정보는 시작하기 섹션을 참조하십시오.
To open the Shader Graph Window you must first create a Shader Graph Asset. For more information see the Getting Started section.
Title Bar
Title Bar는 Shader Graph Window 상단에 위치하며 Graph에 수행할 수 있는 작업을 포함하고 있습니다.
The title bar at the top of the Shader Graph Window contains actions that can be performed on the Graph.
| Item | Description |
|---|---|
| Save Asset | Shader Graph Asset을 업데이트하기 위해 그래프를 저장합니다. Saves the graph to update the Shader Graph Asset |
| Save As | 새 이름으로 Shader Graph Asset을 저장할 수 있는 파일 대화 상자를 엽니다. Opens a file dialog that allows the user to save out the Shader Graph Asset under a new name. |
| Show In Project | Project Window에서 Shader Graph Asset을 강조 표시합니다. Highlights the Shader Graph Asset in the Project Window |
| Check Out | 버전 관리가 활성화된 경우, 소스 제어 공급자로부터 Shader Graph Asset을 체크아웃합니다. If version control is enabled, this will check out the Shader Graph Asset from the source control provider. |
| Color Mode | 그래프의 Color Mode를 선택할 수 있는 드롭다운 메뉴를 제공합니다. Provides the drop down menu to select a Color Mode for the graph. |
| Blackboard | Blackboard의 가시성을 전환합니다. Toggles visibility of the Blackboard. |
| Graph Inspector | Graph Inspector의 가시성을 전환합니다. Toggles visibility of the Graph Inspector. |
| Main Preview | Main Preview의 가시성을 전환합니다. Toggles visbility of the Main Preview. |
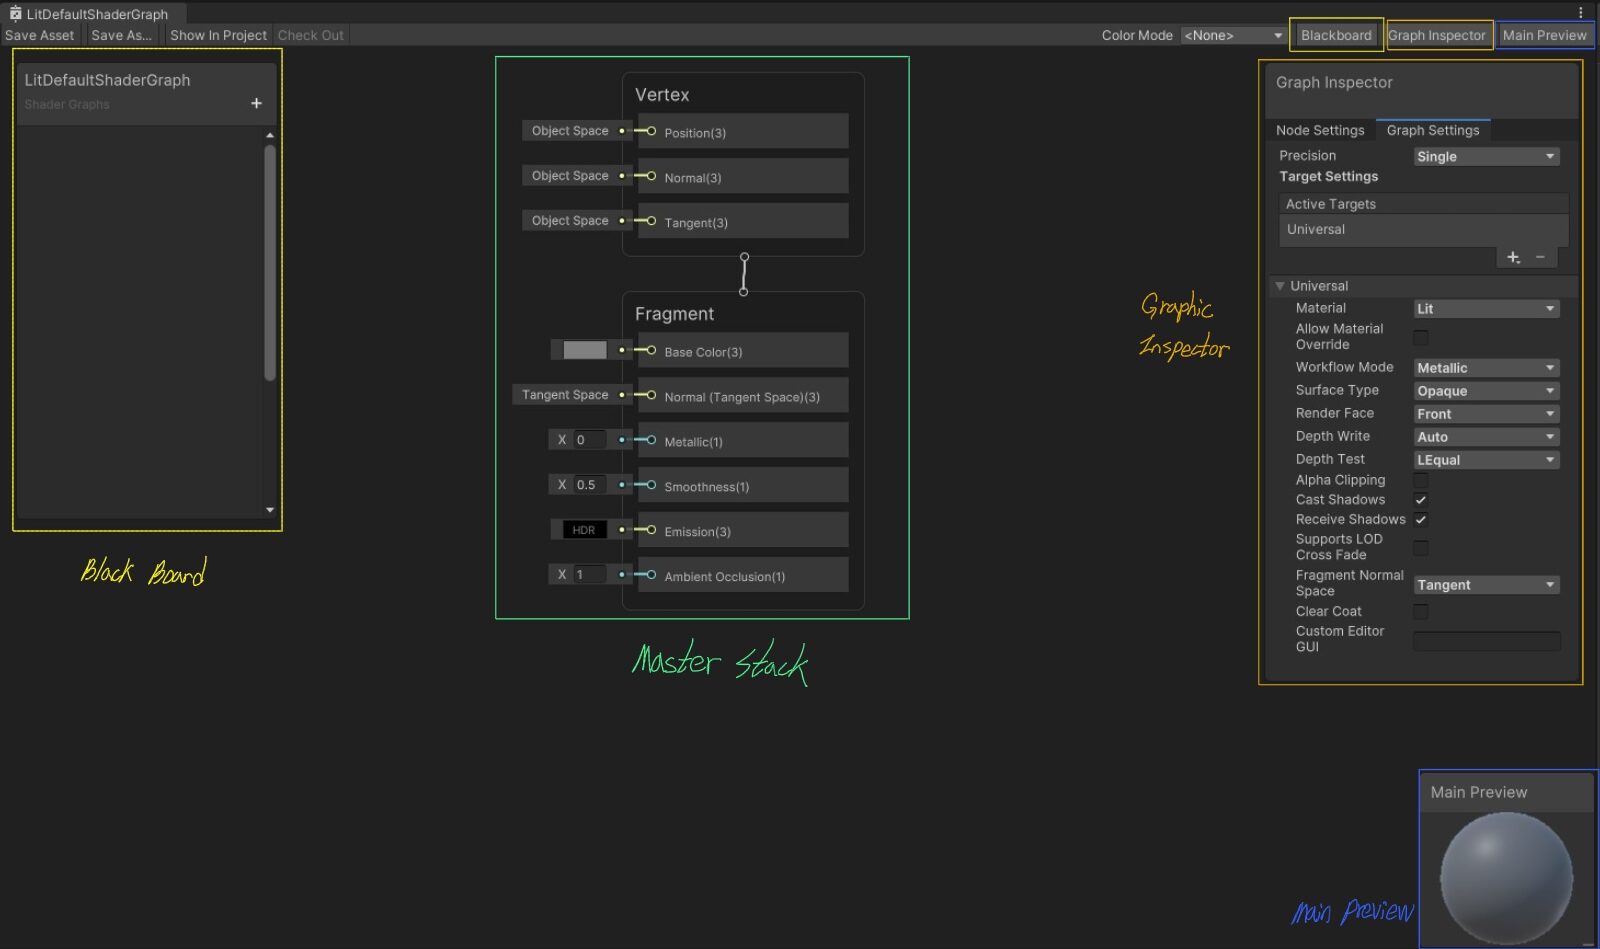
Workspace
Workspace는 Node networks를 생성하는 곳입니다.
The workspace is where you create Node networks.
Alt 키를 누른 채로 왼쪽 마우스 버튼을 눌러서 마우스 스크롤 휠로 패닝 및 줌할 수 있습니다.
You can navigate the workspace by holding Alt and left mouse button to pan and zoom with the scroll wheel.
마우스 왼쪽 버튼을 누른 채로 드래그하여 마르키를 사용하여 여러 Nodes를 선택할 수 있습니다.
You can hold left mouse button and drag to select multiple Nodes with a marquee.
(“마르키(marquee)”는 그래픽 사용자 인터페이스에서 여러 항목을 선택하는 방법을 설명하는 용어)
더 나은 워크플로를 위해 다양한 바로 가기 키도 사용할 수 있습니다.
There are also various shortcut keys to use for better workflow.
| Hotkey | Windows | OSX | Description |
|---|---|---|---|
| Cut | Ctrl + X | Command + X | 선택한 Nodes를 클립보드로 잘라냅니다. Cuts selected Nodes to the clipboard |
| Copy | Ctrl + C | Command + C | 선택한Nodes를 클립보드로 복사합니다. Copies selected Nodes to the clipboard |
| Paste | Ctrl + V | Command + V | 클립보드에 있는 Nodes를 붙여넣습니다. Pastes Nodes in the clipboard |
| Focus | F | F | 모든 또는 선택한 Nodes에 대해 작업 공간에 포커스를 맞춥니다. Focus the workspace on all or selected Nodes |
| Create Node | Spacebar | Spacebar | Create Node Menu를 엽니다. Opens the Create Node Menu |
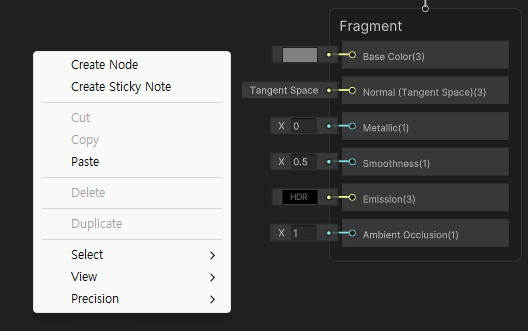
Context Menu
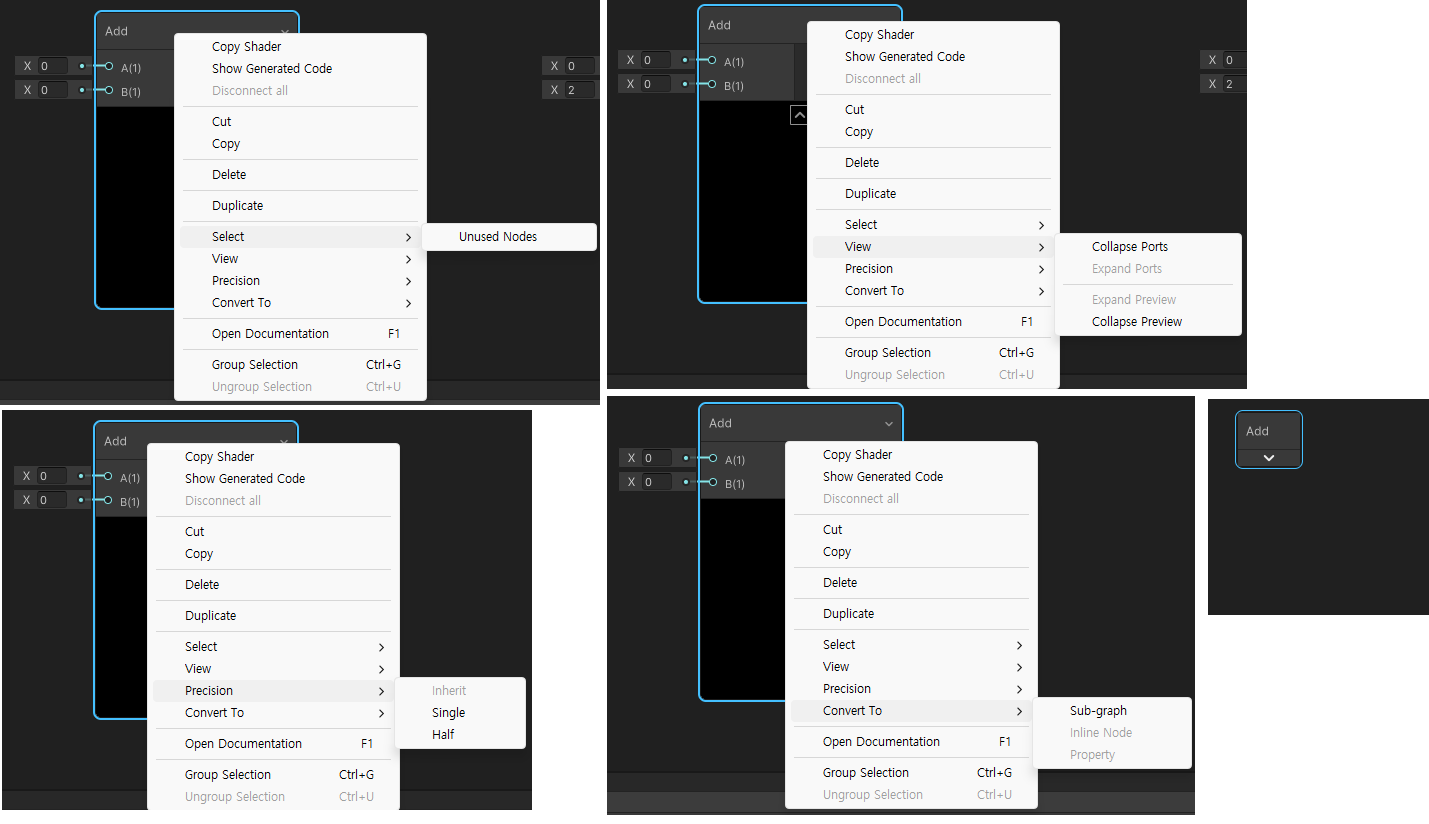
작업 공간 내에서 마우스 오른쪽 버튼을 클릭하면 컨텍스트 메뉴가 열립니다.
Right clicking within the workspace will open a context menu.
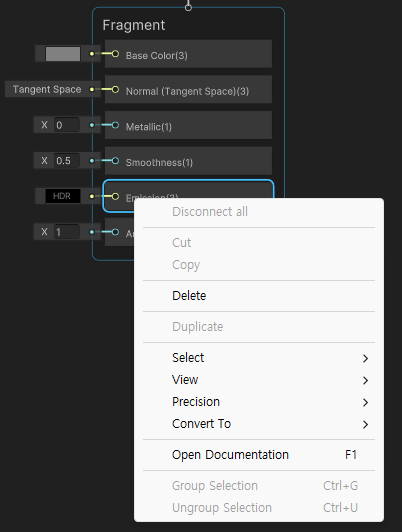
작업 공간 내의 항목(예: Node)을 마우스 오른쪽 버튼으로 클릭하면 해당 항목의 컨텍스트 메뉴가 열리며 작업 공간의 메뉴가 열리지 않음에 유의하세요.
Note that right clicking on an item within the workspace, such as a Node, will open the context menu for that item and not the workspace.
| Item | Description |
|---|---|
| Create Node | Create Node Menu를 엽니다. Opens the Create Node Menu. |
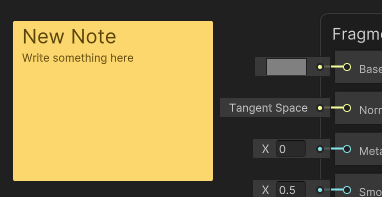
| Create Sticky Note | 생성 그래프에 새로운 Sticky Note를 생성합니다. Creates a new Sticky Note on the Graph. |
| Collapse All Previews | 축소 모든 Nodes의 미리보기를 축소합니다. Collapses previews on all Nodes |
| Cut | 선택한 Nodes를 클립보드로 잘라냅니다. Cuts selected Nodes to the clipboard |
| Copy | 선택한 Nodes를 클립보드로 복사합니다. Copies selected Nodes to the clipboard |
| Paste | 클립보드에 있는Nodes를 붙여넣습니다. Pastes Nodes in the clipboard |
| Delete | 선택한 Nodes를 삭제합니다. Deletes selected Nodes |
| Duplicate | 선택한 Nodes를 복제합니다. Duplicates selected Nodes |
| Select / Unused Nodes | 마스터 스택에서 최종 셰이더 출력에 기여하지 않는 그래프의 모든 Nodes를 선택합니다. Selects all nodes on the graph that are not contributing to the final shader output from the Master Stack. |
| View / Collapse Ports | 축소 선택한 모든 Nodes의 사용되지 않은 포트를 축소합니다. Collapses unused ports on all selected Nodes |
| View / Expand Ports | 확장 선택한 모든 Nodes의 사용되지 않은 포트를 확장합니다. Expands unused ports on all selected Nodes |
| View / Collapse Previews | 축소 선택한 모든 Nodes의 미리보기를 축소합니다. Collapses previews on all selected Nodes |
| View / Expand Previews | 확장 선택한 모든 Nodes의 미리보기를 확장합니다. Expands previews on all selected Nodes |
| Precision / Inherit | 선택한 모든 Nodes의 정밀도를 상속으로 설정합니다. Sets precision of all selected Nodes to Inherit. |
| Precision / Float | 선택한 모든 Nodes의 정밀도를 부동 소수점으로 설정합니다. Sets precision on all selected nodes to Float. |
| Precision / Half | 선택한 모든 Nodes의 정밀도를 반정밀 부동 소수점으로 설정합니다. Sets precision on all selected nodes to Half. |
Blackboard
https://docs.unity3d.com/Packages/com.unity.shadergraph@17.0/manual/Blackboard.html
Description
Blackboard를 사용하여 그래프의 Properties 및 Keywords를 정의, 정렬 및 분류할 수 있습니다.
You can use the Blackboard to define, order, and categorize the Properties and Keywords in a graph.
Blackboard에서 선택한 Shader Graph 에셋 또는 Sub Graph의 경로도 편집할 수 있습니다.
From the Blackboard, you can also edit the path for the selected Shader Graph Asset or Sub Graph.
Accessing the Blackboard
Blackboard는 기본적으로 표시되며, 그래프에서 끌어내려서 분실할 수 없습니다.
The Blackboard is visible by default, and you cannot drag it off the graph and lose it.
하지만, 블랙보드를 Shader Graph Window. 의 어디든 위치시킬 수 있습니다.
However, you are able to position it anywhere in the Shader Graph Window.
창 크기를 조정하더라도 블랙보드는 항상 가장 가까운 모퉁이로부터 동일한 거리를 유지합니다.
It always maintains the same distance from the nearest corner, even if you resize the window.
Adding properties and keywords to the Blackboard
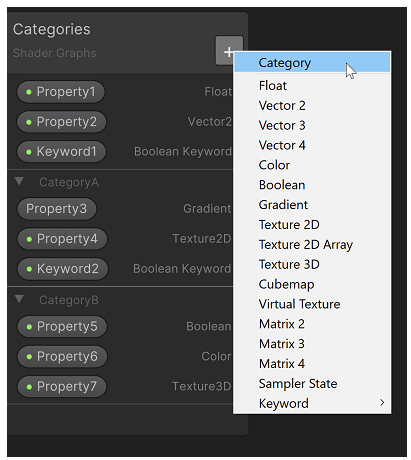
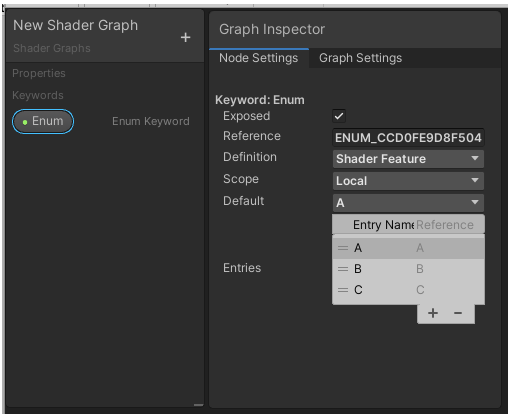
새로운 속성 또는 키워드를 생성하려면 블랙보드의 제목 표시줄에 있는 추가 Add (+) 버튼을 클릭하고 유형을 선택하십시오.
To create a new property or keyword, click the Add (+) button on the Blackboard’s title bar and select a type.
속성 유형의 전체 목록은 “Property Types“을 참조하십시오.
For a full list of property types, see Property Types.
Editing properties and keywords
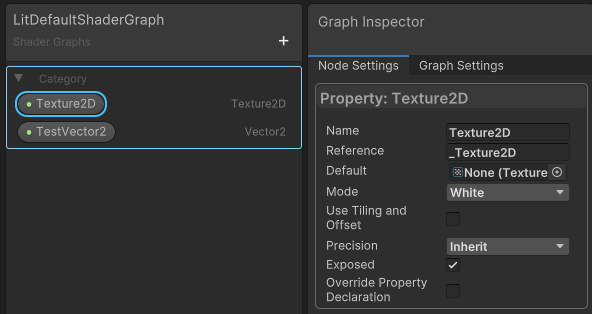
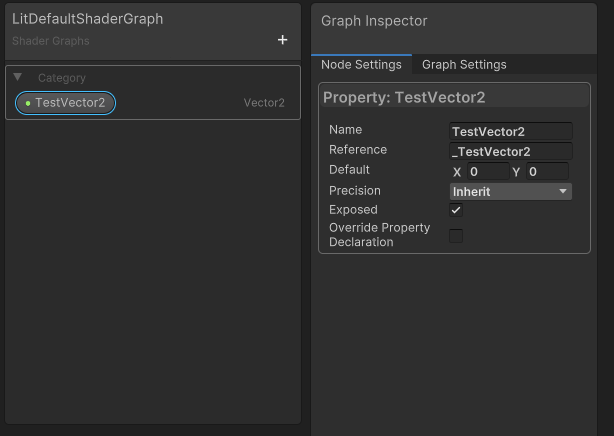
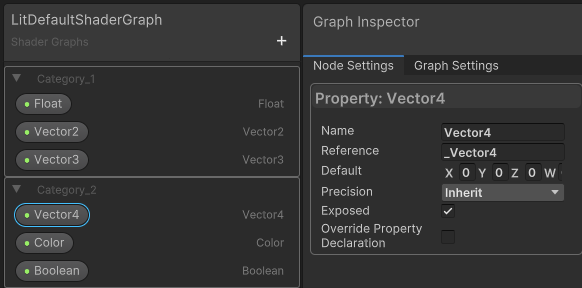
Blackboard 또는 Graph에서 속성 또는 키워드를 선택하여 노드 설정 메뉴에서 설정을 수정합니다.
Select a property or keyword in the Blackboard or graph to modify its settings in the Node Settings Menu.
| Setting | Description |
|---|---|
| Name | 속성의 표시 이름입니다. The property’s display name. 에디터는 디스플레이 이름에서 따옴표를 제거하고 밑줄로 대체합니다. The Editor strips quotation marks from display names and replaces them with underscores. 이름을 변경하려면 Blackboard에서 해당 이름을 두 번 클릭하여 항목을 다시 명명하십시오. Rename an item via the Blackboard by double-clicking on its name. |
| Reference | Shader Graph가이 속성에 대해 내부적으로 사용하는 이름입니다. The name that Shader Graph uses internally for this property. 에디터는 기본적으로이 값을 채웁니다. 그러나 이 값을 수정할 수 있습니다. Although the Editor populates this value by default, you can modify it. 원래 참조 이름으로 되돌리려면 참조 단어 (입력 필드가 아님)를 마우스 오른쪽 버튼으로 클릭하고 To revert to the original reference name, right-click on the word Reference (not the entry field) 컨텍스트 메뉴에서 “참조 재설정”을 선택하십시오. and select Reset Reference in the context menu. 참조 이름에 HLSL이 지원하지 않는 문자가 포함되어 있으면 에디터가 해당 문자를 밑줄( ‘ _ ‘ )로 대체합니다. If the Reference Name contains any characters that HLSL does not support, the Editor replaces those characters with underscores ( ‘ _ ‘ ). |
| Default | 이 Shader Graph를 기반으로 하는 모든 소재에서 이 속성의 기본값입니다. The default value of this property in any Material based on this Shader Graph. 예를 들어, 잔디용 Shader Graph를 작성하고 잔디 색상을 속성으로 노출하는 경우 기본값을 녹색으로 설정할 수 있습니다. For example, if you have a Shader Graph for grass and expose the grass color as a property, you might set the default to Green. |
| Precision | Set the precision mode for the property. See Precision Modes. |
| Exposed | Enable this setting to make the property available for you to edit via the C# API. Enabled by default. |
Modifying and selecting keywords and properties
- 블랙보드에 나열된 항목의 순서를 변경하려면 해당 항목을 끌어다 놓으십시오.
To reorder items listed on the Blackboard, drag and drop them. - 항목을 삭제하려면 Windows에서는 Delete 키를 누르거나 macOS에서는 Command + Backspace 키를 사용하십시오.
To delete items, use the Delete key on Windows or Command + Backspace keys on macOS. - 여러 항목을 선택하려면 선택을 하면서 Ctrl 키를 누르십시오.
To select multiple items, hold down the Ctrl key while making your selections. - 하나 또는 여러 항목의 선택을 취소하려면 해당 항목을 클릭하면서 Ctrl 키를 누른 채로 제거하려는 항목을 클릭하십시오.
To cancel the selection of one or multiple items, hold down the Ctrl key while clicking on the items you want to remove from the selection.
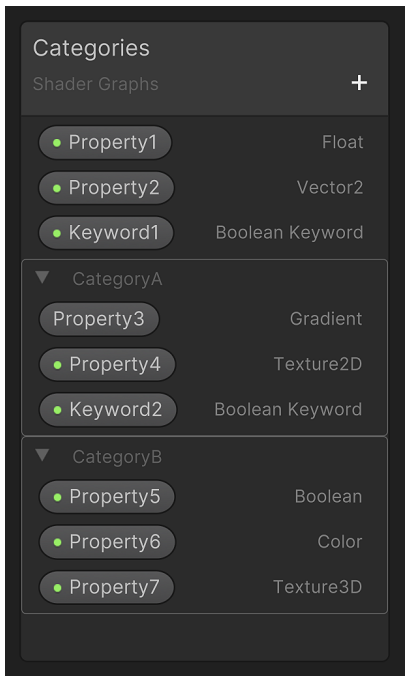
Using Blackboard categories
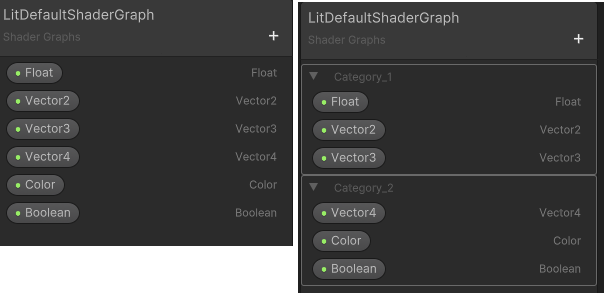
셰이더의 속성을 더 쉽게 검색하려면 categories로 구성하십시오.
To make the properties in your shader more discoverable, organize them into categories.
범주를 확장하고 축소하여 Blackboard을 더 쉽게 탐색할 수 있습니다.
Expand and collapse categories to make the Blackboard easier to navigate.
Creating, renaming, moving, and deleting categories
- 카테고리를 추가하려면 Blackboard에서 +를 사용하십시오.
To add a category, use + on the Blackboard. - 카테고리 이름을 바꾸려면 카테고리 이름을 두 번 클릭하거나 오른쪽 클릭하여 Rename을 선택하십시오.
To rename a category, double-click on the category name, or right-click and select Rename. - Blackboard 내에서 카테고리를 이동하려면 해당 카테고리를 선택하고 드래그하십시오.
To move a category within the Blackboard, select and drag it. - 카테고리를 제거하려면 해당 카테고리를 선택한 후 Delete를 누르거나 오른쪽 클릭하여 Delete를 선택하십시오.
To remove a category, select it and press Delete, or right-click and select Delete.
카테고리를 삭제하면 해당 카테고리 내의 속성도 삭제되므로 보관하려는 속성을 옮기십시오.
Deleting a category also deletes the properties within it, so move those you wish to keep.
Adding, removing, and reordering properties and keywords
- 카테고리에 속성이나 키워드를 추가하려면 펼침 기호 (⌄)로 해당 카테고리를 확장한 다음 속성이나 키워드를 확장된 카테고리로 끌어다 놓으십시오.
To add a property or keyword to a category, expand the category with the foldout (⌄) symbol, then drag and drop the property or keyword onto the expanded category. - 속성이나 키워드를 제거하려면 해당 항목을 선택하고 Delete를 누르거나 오른쪽 클릭하여 Delete를 선택하십시오.
To remove a property or keyword, select it and press Delete, or right-click and select Delete. - 속성이나 키워드의 순서를 변경하려면 해당 카테고리 내에서 드래그하여 끌어다 놓거나 다른 카테고리로 이동시키십시오.
To re-order properties or keywords, drag and drop them within a category or move them into other categories.
Creating a category for specific properties and keywords
여러 속성 또는 키워드를 선택하고 Blackboard에서 +를 사용하여 선택한 모든 항목을 포함하는 카테고리를 만듭니다.
Select multiple properties or keywords and use + on the Blackboard to create a category that contains all of the items you have selected.
Copying and pasting categories, with or without properties
빈 카테고리, 모든 속성을 포함한 카테고리 및 일부 속성을 포함한 카테고리를 하나 이상의 그래프로 복사 및 붙여넣기할 수 있습니다.
You can paste empty categories, categories with all of their properties, and categories with some of their properties into one or more graphs.
모든 속성을 포함한 카테고리를 복사하려면:
To copy a category with all of its properties:
- 해당 속성을 선택하십시오.
Select the property. - Ctrl+C를 사용하여 복사하십시오.
Copy it with Ctrl+C. - Ctrl+V로 대상 그래프에 붙여넣으십시오.
Paste it into your target graph with Ctrl+V.
특정 속성 집합을 복사하려면:
To copy a specific set of properties:
- 해당 카테고리를 선택하십시오.
Select the category. - Ctrl 키를 누른 상태로 유지하십시오.
Hold down the Ctrl key. - 포함하지 않을 속성을 클릭하여 선택을 제거하십시오.
Click the properties you do not want to include to remove them from the selection. - Ctrl+C를 사용하여 속성을 복사하십시오.
Copy the property with Ctrl+C. - Ctrl+V를 사용하여 대상 그래프에 붙여넣으십시오.
Paste it into your target graph with Ctrl+V.
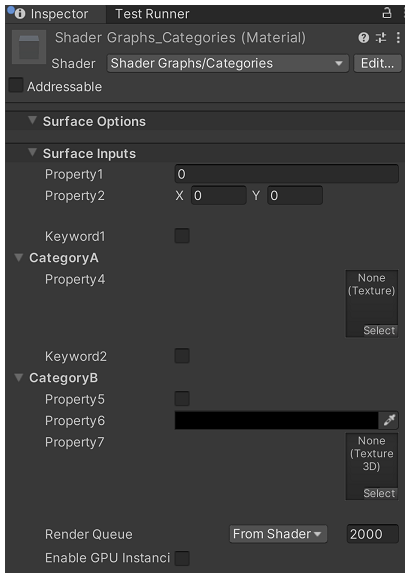
Using categories in the Material Inspector
Shader Graph로 만든 재료를 수정하려면 재료 검사기에서 특정 속성 또는 키워드 값을 조정하거나 그래프 자체를 편집할 수 있습니다.
To modify a material you have created with a Shader Graph, you can adjust specific property or keyword values in the Material Inspector, or edit the graph itself.
Working with Streaming Virtual Textures
Streaming Virtual Texture Properties은 샘플 텍스처 레이어를 나타냅니다.
Streaming Virtual Texture Properties sample texture layers.
이러한 레이어에 액세스하려면 머티리얼 인스펙터에서 해당 이름 옆의 ⌄ 기호로 관련 Virtual Texture section을 확장하십시오.
To access these layers in the Material Inspector, expand the relevant Virtual Texture section with the ⌄ symbol next to its name.
인스펙터를 통해 레이어를 추가하거나 제거할 수 있습니다.
You can add and remove layers via the Inspector.
Exposing properties and keywords
Unity는 기본적으로 속성과 키워드를 노출시킵니다.
Unity exposes properties and keywords by default.
스크립트에서 쓰기 액세스가 가능하므로 그래프 외에도 C# API를 통해 스크립트를 편집할 수 있습니다.
This enables write access from scripts, so that you can edit them via the C# API, in addition to the graph.
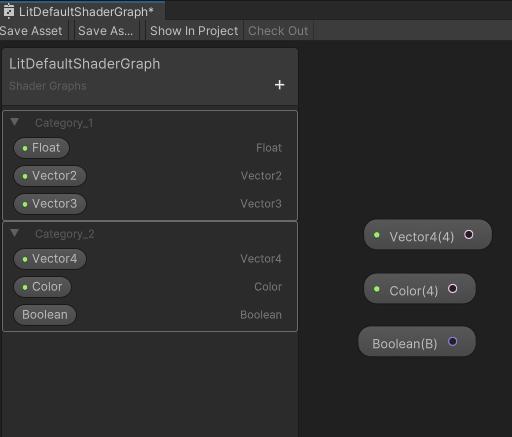
노출된 항목은 레이블에 녹색 점이 있습니다.
Exposed items have a green dot in their label.
이 기능을 Node Settings 메뉴에서 활성화 또는 비활성화할 수 있습니다.
Enable or disable this feature in the Node Settings menu.
Creating nodes
Blackboard에서 속성이나 키워드를 끌어다 그래프에 놓으면 해당 종류의 노드가 생성됩니다.
Drag a property or keyword from the Blackboard into the graph to create a node of that kind.
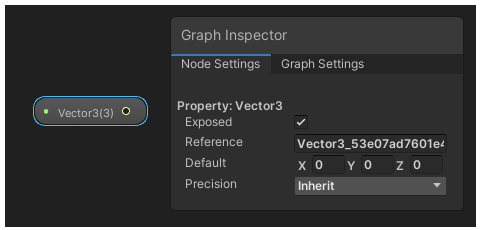
그래프에서 노드의 설정은 Blackboard에서 해당 속성이나 키워드에 대한 설정과 동일합니다.
Settings for a node in the graph are identical to those for the related property or keyword in the Blackboard.
이러한 노드를 확장하여 속성 값의 하위 멤버를 사용할 수 있습니다.
Expand these nodes to use a sub-member of the property value.
노드 이름에는 노출된 속성인 경우 녹색 점이 포함됩니다.
Property node names include a green dot if the property is exposed.
Main Preview
Description
The Main Preview displays a representation of the shader on the active Render Pipeline.
Main Preview는 Render Pipeline에서 셰이더의 표현을 표시합니다.
It updates in real-time and automatically updates to display any changes you make in the Shader Graph.
실시간으로 업데이트되며 Shader Graph에서 만든 변경 사항을 자동으로 업데이트하여 표시합니다.
The title bar of the Main Preview displays the name of the current shader.
Main Preview의 제목 표시줄에는 현재 셰이더의 이름이 표시됩니다.
The Main Preview can be moved to anywhere in the Shader Graph Window and will automatically move with the nearest corner of that window.
Main Preview는 Shader Graph Window에서 어디든지 이동할 수 있으며 해당 창의 가장 가까운 모퉁이로 자동으로 이동합니다.
Graph Inspector
Description
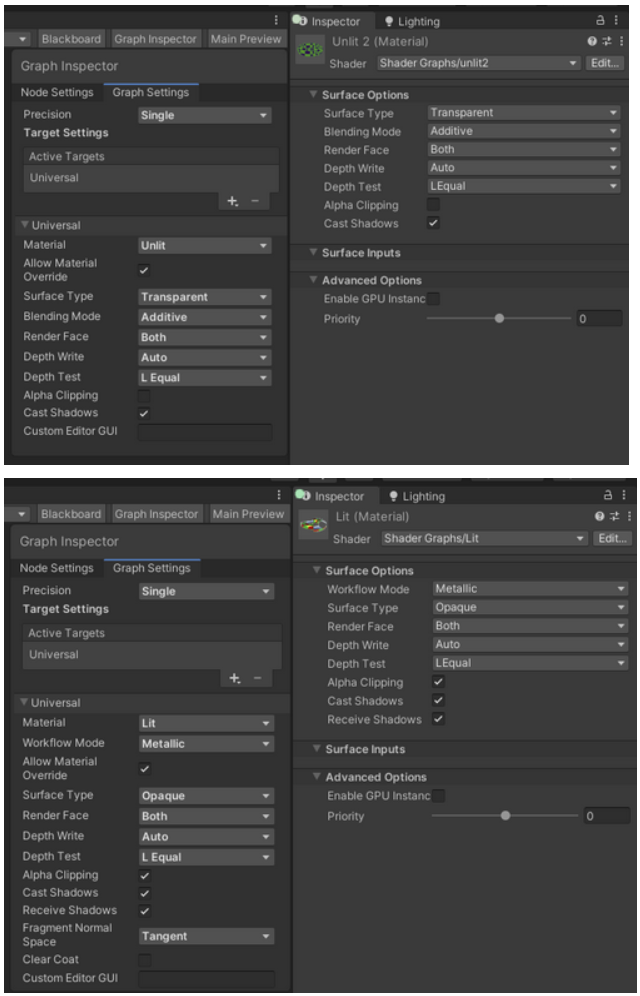
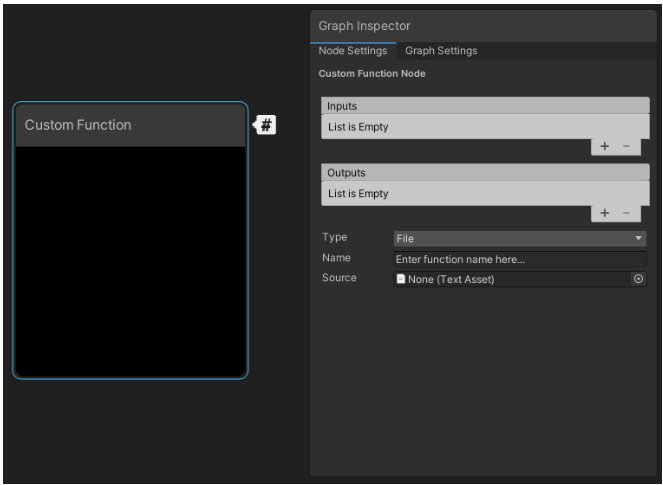
Graph Inspector를 사용하면 Shader Graph Asset의 선택 가능한 그래프 요소 및 그래프 전역 설정과 상호 작용할 수 있습니다.
The Graph Inspector makes it possible for you to interact with any selectable graph elements and graph-wide settings for a Shader Graph Asset.
Graph Inspector를 사용하여 속성 및 기본값을 편집할 수 있습니다.
You can use the Graph Inspector to edit attributes and default values.
Graph Settings를 열 때 Graph Inspector는 기본적으로 그래프 설정 탭을 표시합니다.
When you open a Shader Graph, the Graph Inspector displays the Graph Settings tab by default.
해당 Shader Graph에 대한 그래프 전역 설정이 이 탭에 나타납니다.
Graph-wide settings for that specific Shader Graph appear in this tab.
How to use
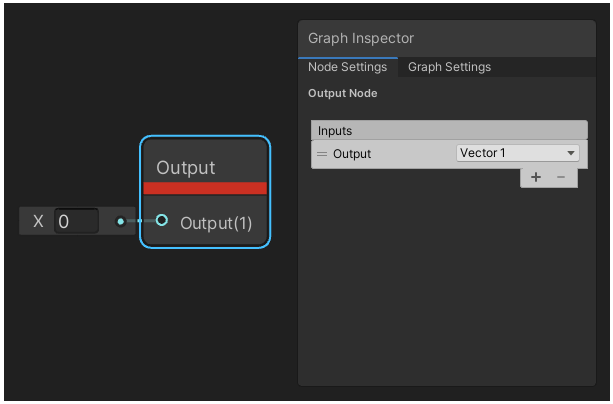
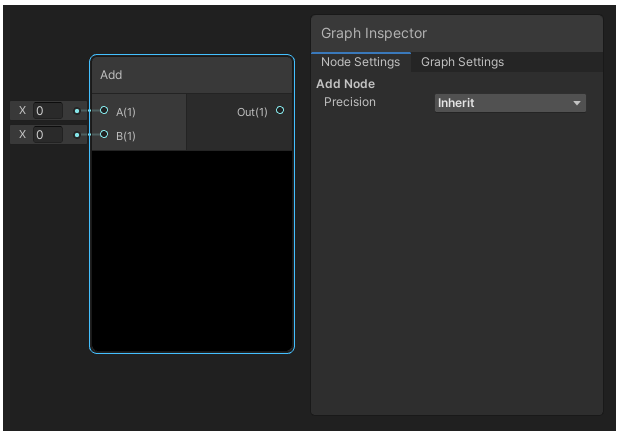
Graph Inspector에서 해당 노드에 사용할 수 있는 설정을 표시하려면 그래프에서 노드를 선택합니다.
Select a node in the graph to display settings available for that node in the Graph Inspector.
해당 노드에 사용할 수 있는 설정이 Graph Inspector의 Node Settings에 나타납니다.
Settings available for that node appear in the Node Settings tab of the Graph Inspector.
예를 들어, 그래프 또는 Blackboard에서 속성 노드를 선택하면 Node Settings 탭에 편집할 수 있는 속성의 속성이 표시됩니다.
For example, if you select a Property node either in the graph or the Blackboard, the Node Settings tab displays attributes of the Property that you can edit.
현재 Graph Inspector와 함께 작동하는 그래프 요소:
Graph elements that currently work with the Graph Inspector:
현재 Graph Inspector와 함께 작동하지 않는 그래프 요소:
Graph elements that currently do not work with the Graph Inspector:
- Edges
- Sticky Notes
- Groups
Material Override
그래프 설정에서 Allow Material Override 옵션을 사용하면 재료 검사기를 통해 특정 그래프 속성을 재정의할 수 있습니다.
Enabling the Allow Material Override option in the Graph Settings makes it possible for you to override certain graph properties via the Material Inspector.