6 – 04 UV와 Time
이번에는 UV가 자동으로 흘러가게 만들 것입니다.
UV에 숫자를 더하면 이미지가 이동하는 것을 알고 있습니다.
Unity에 내장된 변수인 _Time을 이용하여 시간에 따라 이미지가 흘러가는 것처럼 보이게 만들 것입니다.
https://docs.unity3d.com/kr/2021.3/Manual/SL-UnityShaderVariables.html <- 한글

https://docs.unity3d.com/460/Documentation/Manual/SL-BuiltinValues.html <- 영문
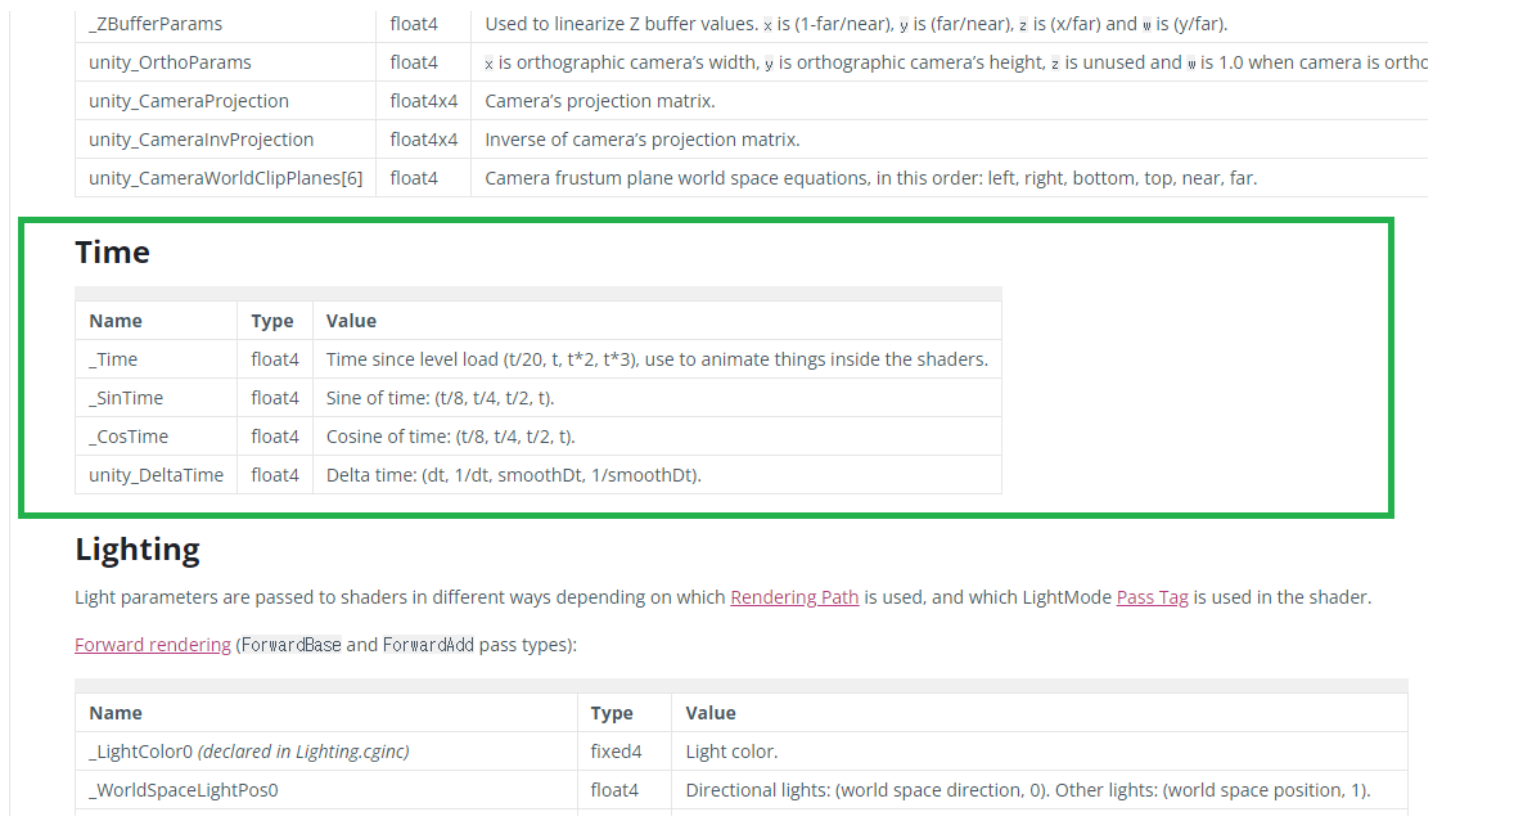
| 이름 | 타입 | 값 |
| _Time | float4 | 씬이 열린 다음부터의 시간 (x, y, z, w)는 (t / 20, t, t * 2, t * 3) 에 대응합니다. _Time.x는 1/20 속도 _Time.y는 원래의 시간 _Time.z는 2배의 속도 시간 _Time.w는 3배의 속도 시간 |
| _SinTime | float4 | sin 그래프의 시간입니다. (x, y, z, w)는 (t / 8, t / 4, t / 2, t) 에 대응합니다. |
| _CosTime | float4 | cos 그래프의 시간입니다. (x, y, z, w)는 (t / 8, t / 4, t / 2, t) 에 대응합니다. |
| Unity_DeltaTime | float4 | Delta Time은 지금의 프레임과 이전 시간의 프레임의 시간차이를 나타냅니다. 컴퓨터의 성능에 따라 프레임을 조작해 줄 댸 주로 사용합니다. (x, y, z, w)는 (dt, 1/dt, smoothDt, 1/smoothDt)와 대응합니다. |
간단하게 UV에 시간을 더해봅니다.
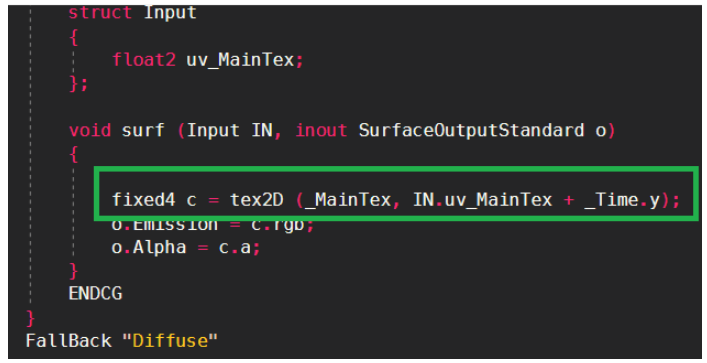
이미지가 좌측 아래로 흘러가는 이유는 U/V 즉 X/Y에 동시에 _Time.y 를 더해주었기 때문입니다.
이를 이용하여 다양한 효과를 줄 수 있습니다.
X방향으로만 흘러가게 할 때
(+ / – 의 조절로 방향도 전환 및 순자를 곱하여 속도 변경도 가능합니다.)
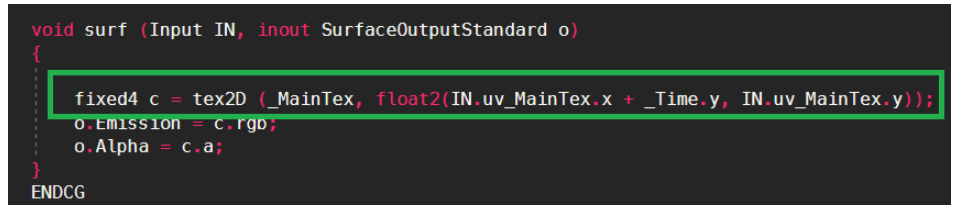
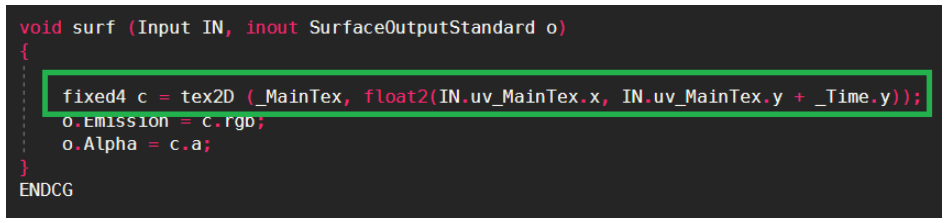
Y방향으로만 흘러가게 할 때
Shader "Custom/UVTest"
{
    Properties
    {
        _MainTex ("Albedo (RGB)", 2D) = "white" {}
    }
    SubShader
    {
        Tags { "RenderType"="Opaque" }
        LOD 200

        CGPROGRAM
        #pragma surface surf Standard
        #pragma target 3.0

        sampler2D _MainTex;

        struct Input
        {
            float2 uv_MainTex;
        };

        void surf (Input IN, inout SurfaceOutputStandard o)
        {

            fixed4 c = tex2D (_MainTex, float2(IN.uv_MainTex.x, IN.uv_MainTex.y + _Time.y));
            o.Emission = c.rgb;
            o.Alpha = c.a;
        }
        ENDCG
    }
    FallBack "Diffuse"
}
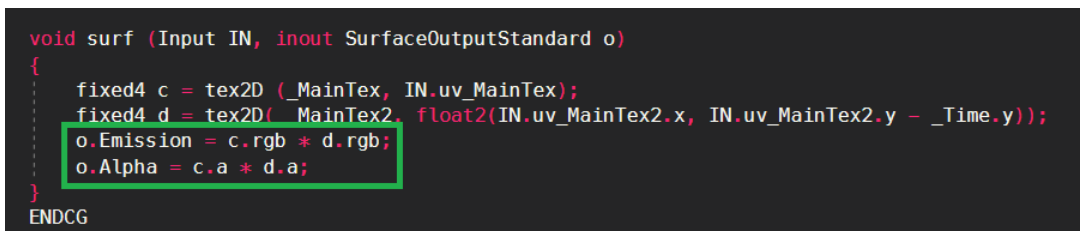
6 – 05 UV를 이용한 불 이펙트 만들기
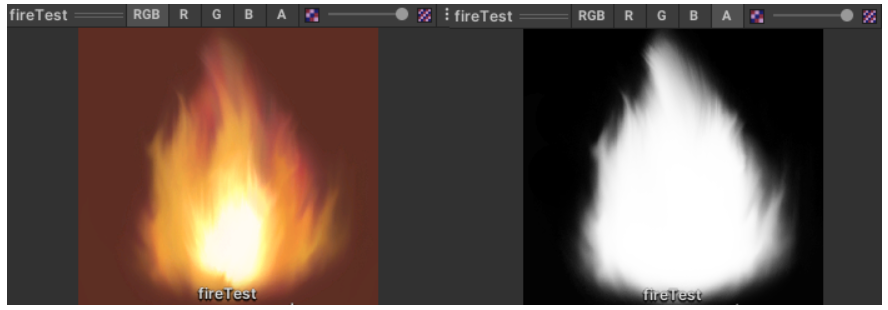
알파 채널을 가지고 있는 이미지를 준비하고 텍스쳐 하나만 받는 쉐이더를 만듭니다.
Shader "Custom/fire3"
{
    Properties
    {
        _MainTex ("Albedo (RGB)", 2D) = "white" {}
    }
    SubShader
    {
        Tags { "RenderType"="Opaque" }
        LOD 200

        CGPROGRAM
        #pragma surface surf Standard
        #pragma target 3.0

        sampler2D _MainTex;

        struct Input
        {
            float2 uv_MainTex;
        };

        void surf (Input IN, inout SurfaceOutputStandard o)
        {
            fixed4 c = tex2D (_MainTex, IN.uv_MainTex);
            o.Albedo = c.rgb;
            o.Alpha = c.a;
        }
        ENDCG
    }
    FallBack "Diffuse"
}
불이라기에는 투명하지도 않고 움직이지도 않으며 빛의 영향까지 받습니다.
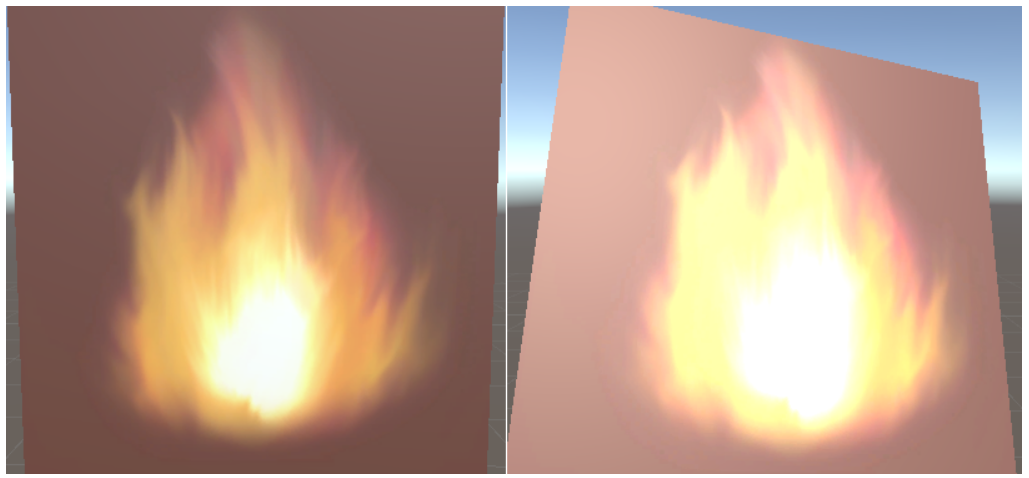
우선 빛의 영향을 받지 않게 하기 위해서 o.Albedo를 o.Emission으로 변경합니다.
이 불의 이미지는 알파 값을 가지고 있는데도 불구하고 투명해지지 않고 있습니다.
알파채널은 그냥 쉽게 작동하지 않고 활성화시키려면 더 근본적인 부분을 건드려야 합니다.
알파는 실제 게임에서 일반 오브젝트와 매우 다르게 처리되며, 상당히 무거운 연산중에 하나입니다.
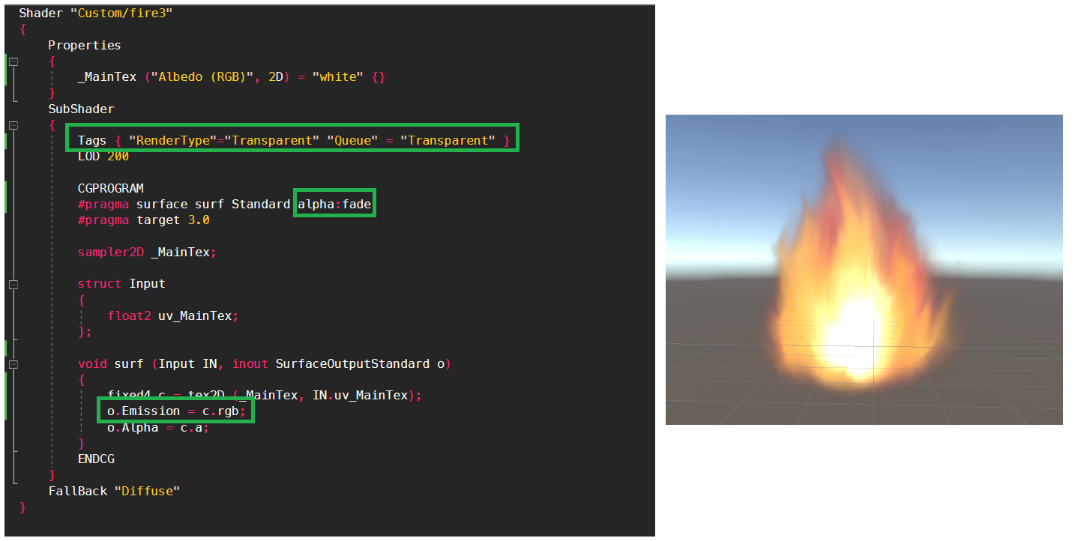
우선 임시로 작동하도록 만듭니다.
Shader "Custom/fire3"
{
    Properties
    {
        _MainTex ("Albedo (RGB)", 2D) = "white" {}
    }
    SubShader
    {
        Tags { "RenderType"="Transparent" "Queue" = "Transparent" }
        LOD 200

        CGPROGRAM
        #pragma surface surf Standard alpha:fade
        #pragma target 3.0

        sampler2D _MainTex;

        struct Input
        {
            float2 uv_MainTex;
        };

        void surf (Input IN, inout SurfaceOutputStandard o)
        {
            fixed4 c = tex2D (_MainTex, IN.uv_MainTex);
            o.Emission = c.rgb;
            o.Alpha = c.a;
        }
        ENDCG
    }
    FallBack "Diffuse"
}
이제 불처럼 보이는 이미지를 만드는 데까지는 성공했습니다.
하지만 움직이지 않으니 그냥 정지된 불 이미지 같습니다.
일단 만들어 놓은 쉐이더에 새로운 이미지(알파 값을 가진)를 추가로 받을 수 있게 만들고 출력해 보겠습니다.
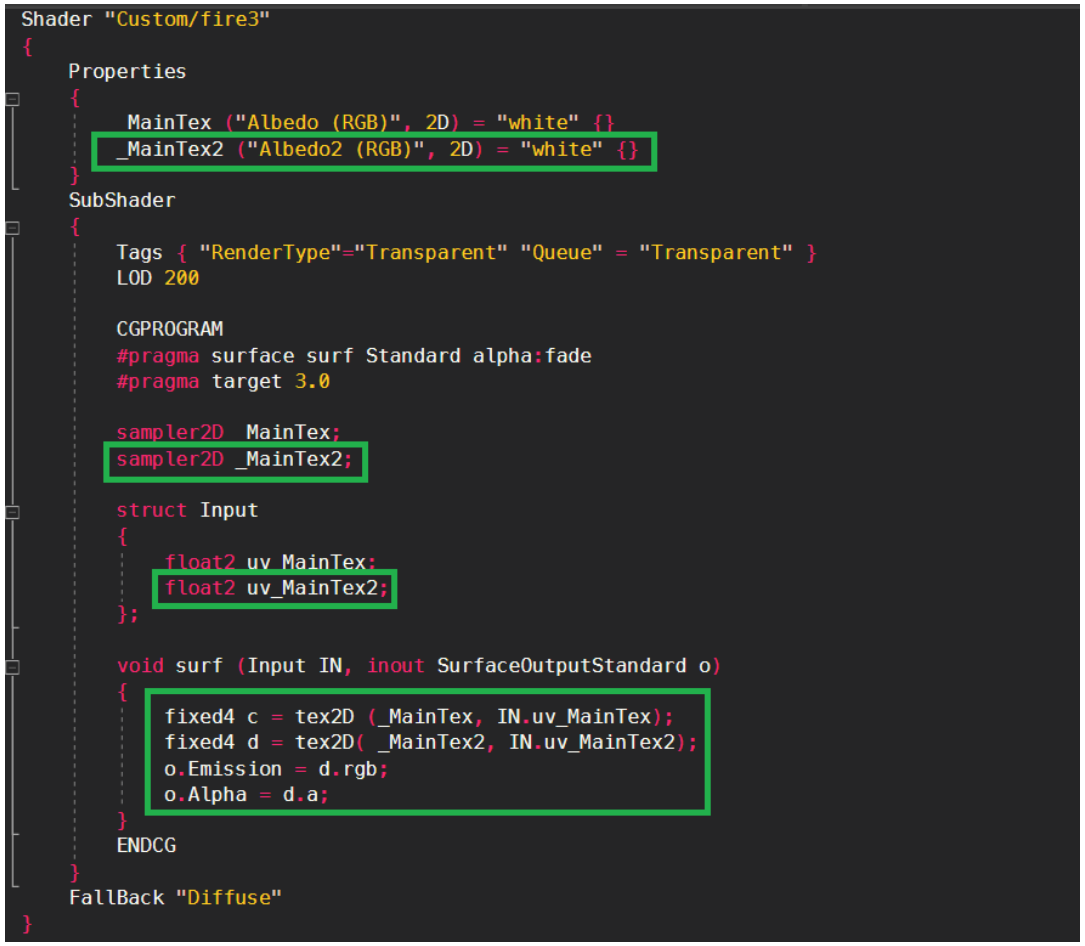
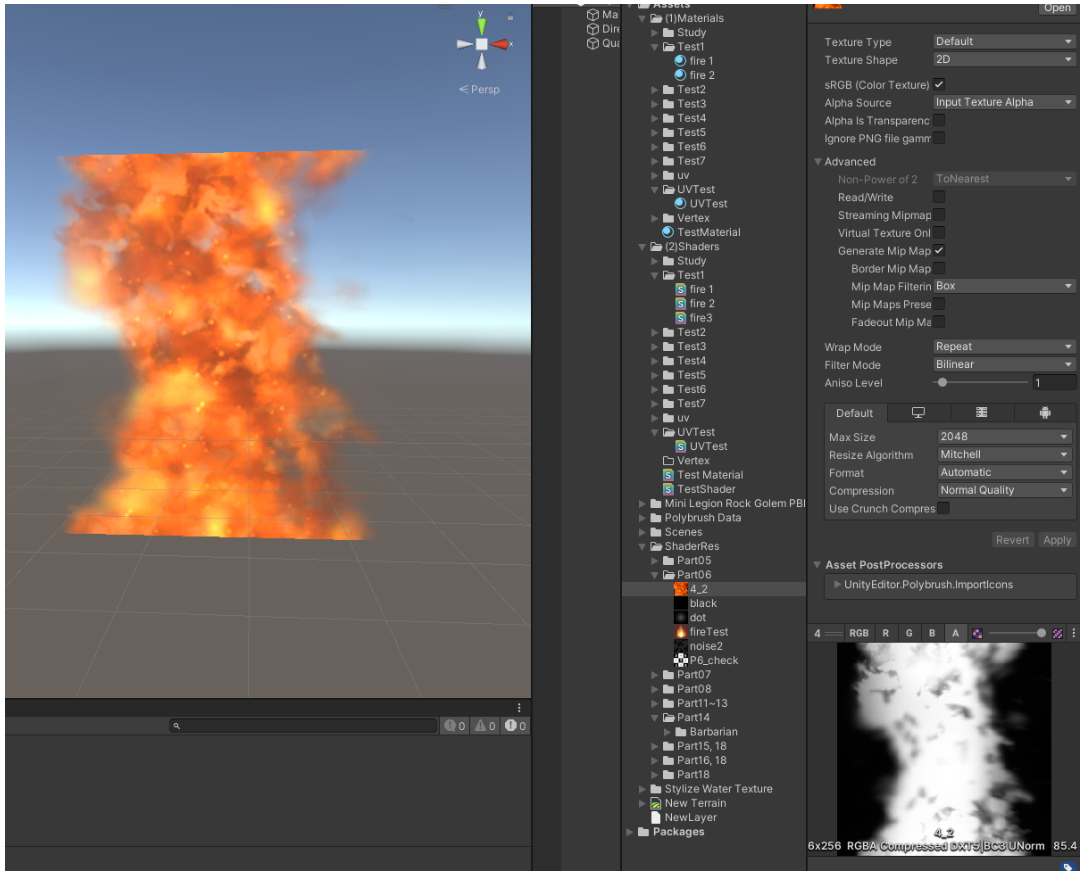
추가로 이 이미지를 _Time.y를 이용하여 위쪽으로 흘러가게 만들겠습니다.
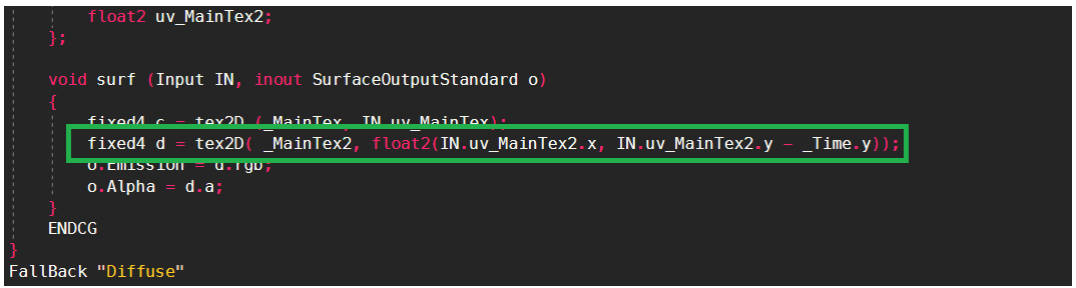
이제 완성된 두 개의 이미지를 합쳐서 완성해 보겠습니다.
간단히 c 와 d의 색상값. 알파 값을 곱해줍니다.
Shader "Custom/fire3"
{
    Properties
    {
        _MainTex ("Albedo (RGB)", 2D) = "white" {}
        _MainTex2 ("Albedo2 (RGB)", 2D) = "white" {}
    }
    SubShader
    {
        Tags { "RenderType"="Transparent" "Queue" = "Transparent" }
        LOD 200

        CGPROGRAM
        #pragma surface surf Standard alpha:fade
        #pragma target 3.0

        sampler2D _MainTex;
        sampler2D _MainTex2;

        struct Input
        {
            float2 uv_MainTex;
            float2 uv_MainTex2;
        };

        void surf (Input IN, inout SurfaceOutputStandard o)
        {
            fixed4 c = tex2D (_MainTex, IN.uv_MainTex);
            fixed4 d = tex2D( _MainTex2, float2(IN.uv_MainTex2.x, IN.uv_MainTex2.y - _Time.y));
            o.Emission = c.rgb * d.rgb;
            o.Alpha = c.a * d.a;
        }
        ENDCG
    }
    FallBack "Diffuse"
}
이런 방법으로 흐르는 물이나 폭포 플라스마 이펙트 등 다양한 표현이 가능합니다.
하지만 이 방법은 매우 무거운 Standard 라이팅이 돌아가고 있고,
뒤의 이미지와 겹쳐도 밝아지지 않는 불완전한 이펙트라고 할 수 있습니다.
6 – 06 이미지를 이용한 UV 제어
이미지를 2장 받을 수 있으며 반투명이 동작하도록 만들어 줍니다.
확실한 이미지를 알 수 있게 체크 무늬로 변경해줍니다.
추가적으로 두번째 이미지를 데이터로 사용하기 위하여 위치를 바꾸어 주고 값을 더 해줍니다.
Shader "Custom/fire3"
{
    Properties
    {
        _MainTex ("Albedo (RGB)", 2D) = "white" {}
        _MainTex2 ("Albedo2 (RGB)", 2D) = "white" {}
    }
    SubShader
    {
        Tags { "RenderType"="Transparent" "Queue" = "Transparent" }
        LOD 200

        CGPROGRAM
        #pragma surface surf Standard alpha:fade
        #pragma target 3.0

        sampler2D _MainTex;
        sampler2D _MainTex2;

        struct Input
        {
            float2 uv_MainTex;
            float2 uv_MainTex2;
        };

        void surf (Input IN, inout SurfaceOutputStandard o)
        {
            fixed4 c = tex2D (_MainTex, IN.uv_MainTex);
            fixed4 d = tex2D( _MainTex2, IN.uv_MainTex2);
            o.Emission = c.rgb;
            o.Alpha = c.a;
        }
        ENDCG
    }
    FallBack "Diffuse"
}
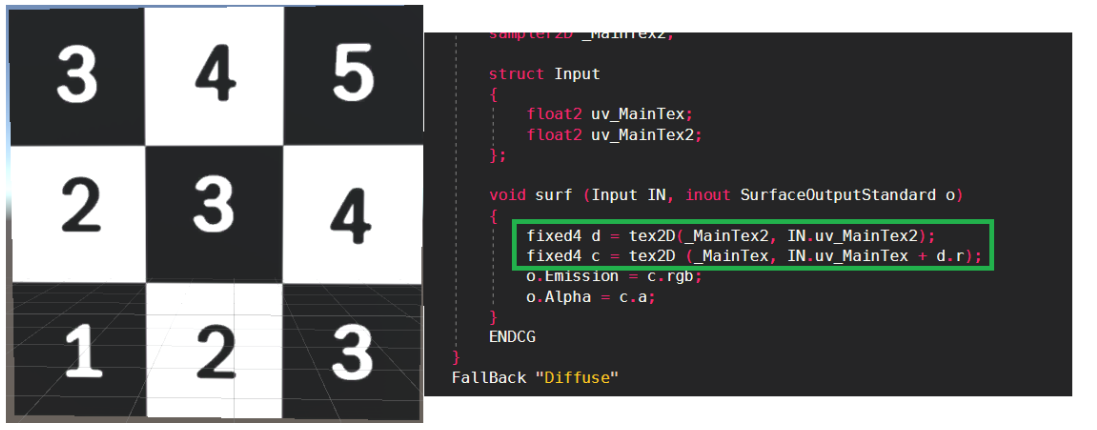
c 의 uv에 d.r을 더해 주었습니다.
d에 검은색을 넣어 주었으므로 d는 float(0, 0, 0, 1)입니다. 그리고 d.r은 0이 되어서 아무 일도 일어나지 않습니다.
하지만 텍스쳐를 변경한다면?
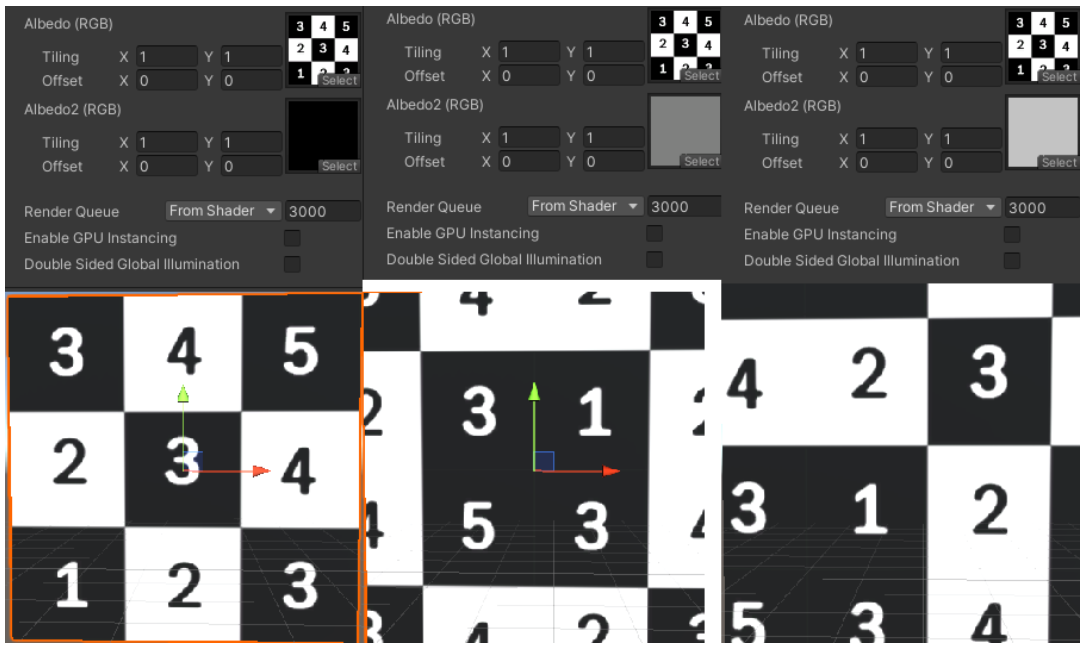
d의 텍스쳐가 회색이라면 d.r은 0.5이므로 텍스쳐 전체 이미지의 절반 정도 이동할 것이고,
d의 텍스쳐가 흰색이라면 d.r은 1 이므로 텍스쳐 전체 이미지만큼 이동하여 원래 이미지와 같아질 것입니다.
그렇다면 단색이 아닌 다른 이미지를 넣으면?
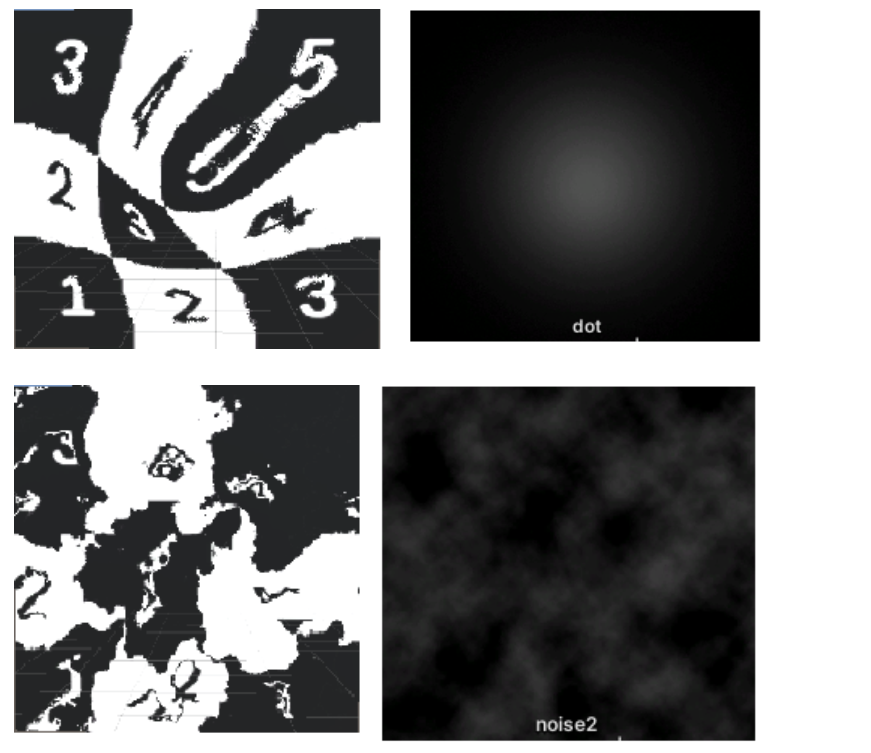
이미지 밝기에 따라서 다르게 이동하였습니다.
이번에는 이미지를 흐르게 해보겠습니다.
Shader "Custom/fire3"
{
    Properties
    {
        _MainTex ("Albedo (RGB)", 2D) = "white" {}
        _MainTex2 ("Albedo2 (RGB)", 2D) = "white" {}
    }
    SubShader
    {
        Tags { "RenderType"="Transparent" "Queue" = "Transparent" }
        LOD 200

        CGPROGRAM
        #pragma surface surf Standard alpha:fade
        #pragma target 3.0

        sampler2D _MainTex;
        sampler2D _MainTex2;

        struct Input
        {
            float2 uv_MainTex;
            float2 uv_MainTex2;
        };

        void surf (Input IN, inout SurfaceOutputStandard o)
        {
            fixed4 d = tex2D(_MainTex2, float2(IN.uv_MainTex2.x, IN.uv_MainTex2.y - _Time.y));
            fixed4 c = tex2D (_MainTex, IN.uv_MainTex + d.r);
            o.Emission = c.rgb;
            o.Alpha = c.a;
        }
        ENDCG
    }
    FallBack "Diffuse"
}
그리고 불이미지로 변경합니다.

위의 코드는 standard 쉐이더 즉, 현재 물리 기반의 라이팅이 작동되고 있다는 뜻 입니다.
이것은 상당히 무거운 공식이며, 실제로 이 쉐이더에서는 이 물리기반 라이팅 공식이 전혀 사용되지 않음에도 불구하고
이 공식이 구동되고 있다는 것을 의미합니다. (자원의 낭비)
이 부분은 나중에 라이팅 연산을 배우고 난 후, 라이팅을 전혀 처리하지 않는 코드로 고치면
실제로 부담없이 사용 할 수 있습니다.