
- Job system
- 잡 시스템 개요 (Job System Overview)
- 잡 개요 (Job Overview)
- 스레드 세이프 타입 (Thread safe types)
- NativeContainer 객체의 종류 (Types of NativeContainers)
- 읽기 및 쓰기 액세스 (Read and Write Access)
- 메모리 할당자 (Memory Allocators)
- NativeContainer 안전 시스템 (NativeContainer safety system)
- 추가 리소스 (Additional resources)
- 커스텀 네이티브 컨테이너 구현 (Implement a custom native container)
- NativeContainer 구조 복사 (Copying NativeContainer structures)
- 사용자 정의 NativeContainer 예제 (Custom NativeContainer example)
- 작업 생성 및 실행 (Create and run a job)
- 잡 의존성 (Job dependencies)
- 병렬 작업 (Parallel jobs)
https://docs.unity3d.com/2023.3/Documentation/Manual/JobSystem.html
Job system
job system을 사용하면 간단하고 안전한 멀티 스레드 코드를 작성할 수 있으므로 응용 프로그램이 사용 가능한 모든 CPU 코어를 사용하여 코드를 실행할 수 있습니다.
The job system lets you write simple and safe multithreaded code so that your application can use all available CPU cores to execute your code.
이것은 응용 프로그램의 성능을 향상시키는 데 도움이 될 수 있습니다
This can help improve the performance of your application.
| Topic | Description |
|---|---|
| Job system overview | Understand Unity’s job system. |
| Jobs overview | Understand the type of jobs available. |
| Thread safe types | Understand thread safe types, such as NativeContainer objects. |
| Implement a custom NativeContainer | Implement custom native containers. |
| Copying NativeContainer structures | Copy and reference multiple native containers. |
| Custom NativeContainer example | Use a real world custom NativeContainer example. |
| Create a job | Create and schedule a job. |
| Job dependencies | Understand job dependencies. |
| Parallel jobs | Use parallel jobs to schedule multiple jobs at once. |
https://docs.unity3d.com/2023.3/Documentation/Manual/JobSystemOverview.html
잡 시스템 개요 (Job System Overview)
Unity의 Job System을 활용하면 멀티스레드 코드를 작성하여 애플리케이션에서 사용 가능한 모든 CPU 코어를 최적으로 활용할 수 있습니다.
Unity’s job system lets you create multithreaded code so that your application can use all available CPU cores to execute your code.
이는 애플리케이션이 하나의 CPU 코어에서 모든 코드를 실행하는 것보다 모든 CPU 코어를 효율적으로 활용함으로써 성능을 향상시킬 수 있습니다.
This provides improved performance because your application uses the capacity of all the CPU cores it’s running on more efficiently, rather than running all code on one CPU core.
Job System만 단독으로 사용할 수 있지만 성능 향상을 위해서는 Unity의 Job System에 최적화된 버스트 컴파일러를 함께 사용해야 합니다.
You can use the job system by itself, but for improved performance, you should also use the Burst compiler, which is specifically designed to compile jobs for Unity’s job system.
버스트 컴파일러는 코드 생성을 개선하여 모바일 디바이스의 성능을 향상시키고 배터리 소모를 줄이는 데 도움을 줍니다.
The Burst compiler has improved code generation, which results in increased performance and a reduction of battery consumption on mobile devices.
또한 Unity의 엔티티 컴포넌트 시스템과 결합하여 고성능 데이터 지향 코드를 생성할 수도 있습니다.
You can also use the job system with Unity’s Entity Component System to create high performance data-oriented code.
( Entity Component System(ECS) + Job System + Burst compiler )
멀티스레딩 (Multithreading)
Unity는 자체 Native job system을 사용하여 응용 프로그램이 실행되는 기기의 CPU 코어 수에 따라 여러 worker thread에서 Native code를 처리합니다.
Unity uses its own Native job system to process its own native code over multiple worker threads, which are dependent on the number of CPU cores available on the device your application runs on.
일반적으로 Unity는 프로그램 시작 시 기본적으로 실행되는 Main thread에서 코드를 실행합니다.
Usually Unity executes your code on one thread which runs by default at the start of the program, called the main thread
그러나 Job System을 사용하면 Unity는 multithreading, 즉 worker thread를 통해 코드를 실행합니다.
However, when you use the job system, Unity executes your code over the worker threads, which is called multithreading.
Multithreading은 CPU가 여러 코어에서 동시에 많은 스레드를 처리할 수 있는 기능을 활용합니다.
Multithreading takes advantage of a CPU’s capability to process a lot of threads at the same time across multiple cores.
작업이나 명령이 차례로 실행되는 대신 동시에 실행되며, Worker thread는 서로 병렬로 실행되고 완료될 때 결과를 Main thread와 동기화합니다.
The worker threads run in parallel to one another, and synchronize their results with the main thread once completed.
Job System은 CPU 코어의 용량에 맞는 충분한 thread만 확보하여 사용 가능한 CPU 코어 수를 구체적으로 파악하지 않아도 필요한 작업을 유연하게 예약할 수 있습니다.
The job system ensures that there are only enough threads to match the capacity of the CPU cores, which means that you can schedule as many tasks as you need without specifically needing to know how many CPU cores are available.
이것은 다른 잡 시스템이 CPU 코어보다 더 많은 thread를 비효율적으로 생성하는 스레드 풀링과 같은 기술에 의존하는 것과 차별화됩니다.
This differs from other job systems that rely on techniques such as thread pooling, where it’s easier to inefficiently create more threads than CPU cores.
작업 훔치기 (Work stealing)
Job System은 작업 훔치기를 스케줄링 전략의 일환으로 활용하여 worker thread 간에 공유되는 작업 양을 균등하게 조절합니다.
The job system uses work stealing as part of its scheduling strategy to even out the amount of tasks shared across worker threads.
Worker thread 간에는 작업을 빠르게 처리하는 경우가 있기 때문에 하나의 worker thread가 모든 작업을 완료하면
다른 worker thread의 대기열을 확인하고, 그 후 해당 thread에 할당된 작업을 처리합니다.
Worker threads might process tasks faster than others, so once a worker thread has finished processing all of its tasks,
it looks at the other worker threads’ queues and then processes tasks assigned to another worker thread.
안전 시스템 (Safety System)
멀티스레드 코드를 보다 쉽게 작성할 수 있도록, Job System은 모든 잠재적인 경쟁 상태를 감지하고 이로 인한 발생 가능한 버그를 예방합니다.
To make it easier to write multithreaded code, the job system has a safety system that detects all potential race conditions and protects you from the bugs they can cause.
경쟁 상태는 한 작업의 결과가 제어할 수 없는 다른 프로세스의 실행 타이밍에 영향을 받을 때 발생합니다.
A race condition happens when the output of one operation depends on the timing of another process outside of its control.
예를 들어, 잡 시스템이 Main thread의 코드에서 데이터에 대한 레퍼런스를 잡으로 전달하는 경우,
잡이 데이터를 쓰는 동시에 Main thread가 데이터를 읽고 있는지 확인할 수 없습니다.
For example, if the job system sends a reference to data from your code in the main thread to a job,
it can’t verify whether the main thread is reading the data at the same time the job is writing to it.
이러한 상황은 경쟁 상태를 야기합니다.
This scenario creates a race condition.
이 문제를 해결하기 위해 잡 시스템은 각 잡이 필요로 하는 데이터에 대한 레퍼런스를 Main thread의 데이터 레퍼런스가 아닌 데이터 사본으로 전송합니다.
To solve this problem, the job system sends each job a copy of the data it needs to operate on rather than a reference to the data in the main thread.
이 사본은 데이터를 격리하여 경쟁 상태를 제거합니다.
this copy isolates the data, which eliminates the race condition.
Job System이 데이터를 복사하는 방식에 따라 Job은 blittable 데이터 타입에만 액세스할 수 있습니다.
The way that the job system copies data means that a job can only access blittable data types. (blittable data Type)
이러한 타입은 관리되는 코드와 네이티브 코드 간에 전달할 때 변환이 필요하지 않습니다.
These types don’t need conversion when passed between managed and native code.
Job System은 memcpy를 사용하여 blittable 타입을 복사하고 Unity의 관리되는 부분과 네이티브 부분 간에 데이터를 전송합니다.
The job system uses memcpy to copy blittable types and transfer the data between the managed and native parts of Unity.
잡을 예약할 때 memcpy를 이용하여 데이터를 기본 메모리에 저장하고, 잡을 실행할 때 해당 사본에 대한 관리되는 측의 액세스 권한을 제공합니다.
It uses memcpy to put data into native memory when scheduling jobs and gives the managed side access to that copy when executing jobs.
자세한 내용은 잡 예약을 참조하십시오.
컬렉션 패키지 (Collections package)
컬렉션 패키지는 핵심 Unity 엔진에서 제공하는 job system 외에도 많은 job types과 native containers를 확장합니다.
In addition to the job system provided in the core Unity engine, the Collections package extends many of the job types and native containers.
자세한 내용은 컬렉션 문서를 참조하십시오.
For more information, see the Collections documentation.
https://docs.unity3d.com/2023.3/Documentation/Manual/job-system-jobs.html
잡 개요 (Job Overview)
잡(Job)은 하나의 구체적인 작업을 수행하는 작은 작업 단위입니다.
A job is a small unit of work that does one specific task.
잡은 매개변수를 받아들이고 데이터에 작업을 수행하는데, 메서드 호출과 유사한 동작을 합니다.
A job receives parameters and operates on data, similar to how a method call behaves.
잡은 독립적으로 실행될 수도 있고, 또는 다른 잡이 완료되어야만 실행될 수도 있습니다.
Jobs can be self-contained, or they can depend on other jobs to complete before they can run.
Unity에서 잡은 IJob 인터페이스를 구현하는 모든 구조체를 의미합니다.
In Unity, a job refers to any struct that implements the IJob interface.
오직 Main thread 에서만 잡을 예약하고 완료할 수 있습니다.
Only the main thread can schedule and complete jobs.
Main thread는 실행 중인 잡의 내용에 액세스할 수 없으며, 두 잡이 동시에 하나의 잡 내용에 액세스할 수 없습니다.
It can’t access the content of any running jobs, and two jobs can’t access the contents of a job at the same time.
잡이 효율적으로 실행되도록 하려면 서로 종속적으로 만들 수 있습니다.
To ensure efficient running of jobs, you can make them dependent on each other.
Unity의 잡 시스템을 사용하면 복잡한 종속성 체인을 생성하여 잡이 올바른 순서로 완료되도록 할 수 있습니다.
Unity’s job system allows you to create complex dependency chains to ensure that your jobs complete in the correct order.
잡 타입 (Job types)
- IJob
작업 스레드에서 단일 작업을 실행합니다.
Runs a single task on a job thread. - IJobParallelFor
작업을 병렬로 실행합니다.
Runs a task in parallel.
각각의 병렬로 실행되는 worker thread는 안전하게 worker thread 간에 공유된 데이터에 액세스하기 위한 독점적인 인덱스를 갖습니다.
Each worker thread that runs in parallel has an exclusive index to access shared data between worker threads safely. - IJobParallelForTransform
작업을 병렬로 실행합니다.
Runs a task in parallel.
병렬로 실행되는 각각의 worker thread는 독점적인 Transform을 가지고 작업을 수행합니다.
Each worker thread running in parallel has an exclusive Transform from the transform hierarchy to operate on. - IJobFor
IJobParallelFor와 동일하지만, 작업이 병렬로 실행되지 않도록 작업을 예약할 수 있습니다.
The same asIJobParallelFor, but allows you to schedule the job so that it doesn’t run in parallel.
IJob
interface in Unity.Jobs
https://docs.unity3d.com/kr/2023.2/ScriptReference/Unity.Jobs.IJob.html
설명
IJob을 사용하여 다른 작업 및 기본 스레드와 병렬로 실행되는 단일 작업을 예약합니다.
An interface that allows you to schedule a single job that runs in parallel to other jobs and the main thread.
작업이 예약되면 해당 작업의 실행 메서드가 worker thread에서 호출됩니다.
After a job is scheduled, the job’s Execute method is invoked on a worker thread.
반환된 JobHandle을 사용하여 작업이 완료되었는지 확인할 수 있습니다.
You can use the returned JobHandle to make sure that the job has completed.
종속성으로 다른 작업에 전달될 수도 있으므로 worker thread에서 작업이 차례로 실행되도록 할 수 있습니다.
You can also pass the JobHandle to other jobs as a dependency, which ensures that jobs are executed one after another on the worker threads.
ApplyVelocitySample.cs
using UnityEngine;
using Unity.Collections;
using Unity.Jobs;

class ApplyVelocitySample : MonoBehaviour
{
    // 작업 구조체 정의
    struct VelocityJob : IJob
    {
        // 작업에서 액세스할 모든 데이터를 선언
        // 읽기 전용으로 선언함으로써 여러 작업이 데이터에 병렬로 액세스할 수 있게 함
        [ReadOnly]
        public NativeArray<Vector3> velocity;

        // 기본적으로 컨테이너는 읽기 및 쓰기로 가정됨
        public NativeArray<Vector3> position;

        // 델타 타임은 일반적으로 작업이 프레임 개념을 가지지 않기 때문에 작업에 복사되어야 함
        // 메인 스레드는 동일한 프레임 또는 다음 프레임에 작업을 기다리지만, 작업은 워커 스레드에서 실행될 때 결정적이고 독립적인 방식으로 작업을 수행해야 함
        public float deltaTime;

        // 작업에서 실행되는 코드
        public void Execute()
        {
            // 델타 타임과 속도에 기반하여 위치 이동
            for (var i = 0; i < position.Length; i++)
                position[i] = position[i] + velocity[i] * deltaTime;
        }
    }

    public void Update()
    {
        var position = new NativeArray<Vector3>(500, Allocator.Persistent);

        var velocity = new NativeArray<Vector3>(500, Allocator.Persistent);

        int _l = velocity.Length;
        for (var i = 0; i < _l; i++)
            velocity[i] = new Vector3(0, 10, 0);

        // 작업 데이터 초기화
        var job = new VelocityJob()
        {
            deltaTime = Time.deltaTime,
            position = position,
            velocity = velocity
        };

        // 작업 예약, 나중에 대기할 수 있는 JobHandle 반환
        JobHandle jobHandle = job.Schedule();

        // 작업이 완료될 때까지 대기
        // 작업을 즉시 완료하는 것은 권장되지 않으며,
        // 실제로 병렬성을 제공하지 않음
        // 작업을 프레임 초기에 예약하고 나중에 프레임 중에 대기하는 것이 최적임
        jobHandle.Complete();

        Debug.Log(job.position[0]);

        // Native 배열은 수동으로 Dispose해야 함
        position.Dispose();
        velocity.Dispose();
    }
}
IJobParallelFor
interface in Unity.Jobs
https://docs.unity3d.com/2023.3/Documentation/ScriptReference/Unity.Jobs.IJobParallelFor.html
설명
각 Native Container의 요소 또는 고정된 반복 횟수에 대해 동일한 독립적인 작업을 수행하는 작업을 나타내는 인터페이스입니다.
Interface that represents a job that performs the same independent operation for each element of a native container or for a fixed number of iterations.
IJobParallelFor 작업을 예약하면 해당 작업의 Execute(int index) 메서드가 여러 Worker Thread에서 서로 병렬로 호출됩니다.
When you schedule an IJobParallelFor job, its Execute(int index) method is invoked on multiple worker threads in parallel to each other.
Execute(int index)는 0부 제공된 길이까지 각 인덱스에 대해 한 번 실행됩니다.Execute(int index) is executed once for each index from 0 to the provided length.
각 반복은 다른 반복과 독립적이어야 하며, 안전 시스템은 이 규칙을 강제합니다.
Each iteration must be independent from other iterations and the safety system enforces this rule for you.
인덱스에는 보장된 순서가 없으며 여러 코어에서 병렬로 실행됩니다.
The indices have no guaranteed order and are executed on multiple cores in parallel.
Unity는 제공된 배치 크기 이상으로 작업을 청크로 자동 분할하고 Worker Thread 수, 배열 길이 및 배치 크기에 따라 적절한 수의 작업을 예약합니다.
Unity automatically splits the work into chunks no less than the provided batchSize, and schedules an appropriate number of jobs based on the number of worker threads, the length of the array, and the batch size.
배치 크기는 작업에서 수행되는 작업 양에 따라 선택해야 합니다.
Choose the batch size depending on the amount of work performed in the job.
예를 들어 Vector3를 더하는 간단한 작업은 배치 크기가 32에서 128이어야 합니다.
A simple job, for example adding a couple of Vector3 to each other should have a batch size of 32 to 128.
그러나 수행되는 작업이 매우 비용이 많이 드는 경우 작은 배치 크기를 사용하는 것이 가장 좋습니다. 예를 들어 배치 크기가 1인 경우입니다.
However if the work performed is very expensive then it’s best practice to use a small batch size, for example a batch size of 1.
IJobParallelFor는 작업 훔치기를 수행하기 위해 극소의 연산을 사용합니다. 배치 크기는 작을 수 있지만 무료는 아닙니다.
IJobParallelFor uses atomic operations to perform work stealing. Batch sizes can be small but they are not for free.
반환된 JobHandle을 사용하여 작업이 완료되었는지 확인하거나 다른 작업에 종속성으로 전달하여 Worker Thread에서 작업이 서로 차례대로 실행되도록 할 수 있습니다.
You can use the returned JobHandle to make sure that the job has completed, or you can pass it to other jobs as a dependency to make sure that the jobs are executed one after another on the worker threads.
ApplyVelocityParallelForSample.cs
using Unity.Collections;
using Unity.Jobs;
using UnityEngine;

class ApplyVelocityParallelForSample : MonoBehaviour
{
    struct VelocityJob : IJobParallelFor
    {
        // 작업에서 액세스될 모든 데이터를 선언합니다.
        // 읽기 전용으로 선언함으로써 여러 작업이 데이터에 병렬로 액세스할 수 있습니다.
        [ReadOnly]
        public NativeArray<Vector3> velocity;

        // 기본적으로 컨테이너는 읽기 및 쓰기로 가정됩니다.
        public NativeArray<Vector3> position;

        // 작업은 일반적으로 프레임의 개념이 없기 때문에 델타 타임은 작업으로 복사되어야 합니다.
        // 주 스레드는 작업이 동일한 프레임이나 다음 프레임에 실행되기를 기다리지만,
        // 작업은 언제 워커 스레드에서 실행될지에 관계없이 결정론적으로 독립적으로 작업해야 합니다.
        public float deltaTime;

        // 실제로 작업에서 실행되는 코드
        public void Execute(int i)
        {
            // 델타 타임과 속도에 기반하여 위치를 이동합니다.
            position[i] = position[i] + velocity[i] * deltaTime;
        }
    }

    public void Update()
    {
        // 위치에 대한 네이티브 배열 초기화
        var position = new NativeArray<Vector3>(500, Allocator.Temp);

        // 속도에 대한 네이티브 배열 초기화
        var velocity = new NativeArray<Vector3>(500, Allocator.Temp);
        for (var i = 0; i < velocity.Length; i++)
            velocity[i] = new Vector3(0, 10, 0);

        // 작업 데이터 초기화
        var job = new VelocityJob()
        {
            deltaTime = Time.deltaTime,
            position = position,
            velocity = velocity
        };

        // 병렬 작업 예약. 첫 번째 매개변수는 각 반복(iteration)을 수행할 횟수이며,
        // 두 번째 매개변수는 배치 크기(batch size)로,
        // 내부 루프에서 Execute(i)를 불러오는 오버헤드가 없는 값입니다.
        // 각 반복에서 수행할 작업이 많은 경우에는 1의 값을 사용할 수 있습니다.
        // 작업이 매우 적은 경우에는 32 또는 64의 값이 적절합니다.
        JobHandle jobHandle = job.Schedule(position.Length, 64);

        // 작업이 완료될 때까지 대기합니다.
        // 작업을 즉시 완료하는 것은 권장되지 않습니다.
        // 왜냐하면 그렇게 되면 다른 작업이 병렬로 실행되는 기회가 줄어들기 때문입니다.
        // 작업을 프레임 초반에 예약하고, 프레임 후반에 완료되길 기다리는 것이 최적입니다.
        jobHandle.Complete();

        Debug.Log(job.position[0]);

        // 네이티브 배열은 수동으로 해제되어야 합니다.
        position.Dispose();
        velocity.Dispose();
    }
}
IJobParallelForTransform
interface in UnityEngine.Jobs
https://docs.unity3d.com/kr/2023.2/ScriptReference/Jobs.IJobParallelForTransform.html
설명
Description
변환을 위한 병렬 작업을 사용하면 작업에 전달된 모든 변환의 각 위치, 회전 및 배율에 대해 동일한 독립적 작업을 수행할 수 있습니다.
An interface that allows you to perform the same independent operation for each position, rotation and scale of all the transforms passed into a job.
ApplyVelocitySample.cs
using UnityEngine;
using Unity.Collections;
using Unity.Jobs;
using UnityEngine.Jobs;

class ApplyVelocitySample : MonoBehaviour
{
    public struct VelocityJob : IJobParallelForTransform
    {
        // Jobs는 작업에서 액세스 될 모든 데이터를 선언합니다.
        // 읽기 전용으로 선언함으로써 여러 작업이 데이터에 병렬로 액세스할 수 있게 합니다.
        [ReadOnly]
        public NativeArray<Vector3> velocity;

        // 작업에서는 일반적으로 프레임의 개념이 없기 때문에 델타 타임은 작업으로 복사되어야 합니다.
        // 메인 스레드는 작업이 동작하는 동안 같은 프레임 또는 다음 프레임에 대기하지만,
        // 작업은 워커 스레드에서 실행될 때에도 작업이 실행되는 시기에 독립적으로 작업을 수행해야 합니다.
        public float deltaTime;

        // 실제로 작업에서 실행되는 코드
        public void Execute(int index, TransformAccess transform)
        {
            // 델타 타임과 속도를 기반으로 변환을 이동합니다.
            var pos = transform.position;
            pos += velocity[index] * deltaTime;
            transform.position = pos;
        }
    }

    // 인스펙터에서 작업할 변환을 할당합니다.
    [SerializeField] public Transform[] m_Transforms;
    TransformAccessArray m_AccessArray;

    void Awake()
    {
        // 변환을 TransformAccessArray 인스턴스에 저장하여
        // 작업에서 액세스할 수 있도록 합니다.
        m_AccessArray = new TransformAccessArray(m_Transforms);
    }

    void OnDestroy()
    {
        // TransformAccessArray는 수동으로 폐기해야 합니다.
        m_AccessArray.Dispose();
    }

    public void Update()
    {
        var velocity = new NativeArray<Vector3>(m_Transforms.Length, Allocator.Persistent);

        for (var i = 0; i < velocity.Length; ++i)
            velocity[i] = new Vector3(0f, 10f, 0f);

        // 작업 데이터를 초기화합니다.
        var job = new VelocityJob()
        {
            deltaTime = Time.deltaTime,
            velocity = velocity
        };

        // 병렬-for-변환 작업을 예약합니다.
        // 메서드는 작업에서 동작될 TransformAccessArray를 취합니다.
        JobHandle jobHandle = job.Schedule(m_AccessArray);

        // 작업이 완료될 때까지 대기합니다.
        // 작업을 즉시 완료하는 것은 권장되지 않습니다.
        // 왜냐하면 이렇게하면이 작업과 병렬로 다른 작업이 실행될 가능성이 줄어듭니다.
        // 최적으로는 프레임 초반에 작업을 예약한 다음 프레임 중후반에 대기해야 합니다.
        jobHandle.Complete();

        Debug.Log(m_Transforms[0].position);

        // Native 배열은 수동으로 폐기해야 합니다.
        velocity.Dispose();
    }
}
IJobFor
interface in Unity.Jobs
https://docs.unity3d.com/ScriptReference/Unity.Jobs.IJobFor.html
설명
Description
Jobs는 Native Container의 각 요소 또는 고정된 반복 횟수에 대해 동일한 독립적인 작업을 수행할 수 있게 해줍니다.
An interface that represents a job that performs the same independent operation for each element of a native container or for a fixed number of iterations.
이 작업은 작업을 어떻게 스케줄하길 원하는지에 대한 여러 옵션을 허용합니다:
This job type has the following options to schedule work:
- IIJobForExtensions.Run
작업을 주 스레드에서 실행하고 즉시 완료합니다.
runs the job on the main thread and finishes immediately. - IJobForExtensions.Schedule
작업을 Worker Thread(또는 주 스레드)에서 실행하도록 예약하지만 작업이 단일 스레드에서 수행되어야 함을 나타냅니다.
schedules the job to run on a worker thread or the main thread, but indicates that the work should happen in a single thread.
이 옵션은 주 스레드 이외에서 작업을 수행할 수 있게 해주지만, 작업이 순차적으로 수행되기 때문에 이해하기 쉽습니다. - IJobForExtensions.ScheduleParallel
작업을 병렬로 실행되도록 예약합니다.
schedules the job to run on multiple worker threads concurrently.
이 스케줄링 옵션은 최상의 성능을 제공할 수 있지만, 동시에 여러 Worker Thread에서 동일한 데이터에 접근할 때 발생할 수 있는 충돌을 이해해야 합니다.
This option allows for work to be done off the main thread, but the work is performed sequentially. Execute(int index)
제공된 길이에 대해 0 에서부터 각 인덱스까지 한 번씩 실행됩니다.
is executed once for each index from 0 to the provided length.
Run and Schedule 은 작업의 Execute(intindex) 메서드가 순차적으로 호출됨을 보장합니다.Run and Schedule guarantees that the the job’s Execute(int index) method is invoked sequentially.
Schedule Parallel은 작업의 Execute 메서드를 여러 개의 워커 스레드에서 서로 병렬로 호출하므로 순차적으로 호출하지 않습니다.ScheduleParallel doesn’t invoke the job’s Execute method sequentially because it’s called from multiple worker threads in parallel to each other.
각 반복은 다른 반복과 독립적이어야 하며 안전 시스템이 이 규칙을 강제합니다.
Each iteration must be independent from other iterations and the safety system enforces this rule for you.
인덱스에는 보장된 순서가 없으며 여러 코어에서 병렬로 실행됩니다.
The indices have no guaranteed order and are executed on multiple cores in parallel.
Unity는 작업을 제공된 batchSize 이상의 크기로 자동으로 나누고 워커 스레드 수, 배열의 길이 및 배치 크기에 따라 적절한 수의 작업을 예약합니다.
Unity automatically splits the work into chunks of no less than the provided batchSize,
and schedules an appropriate number of jobs based on the number of worker threads, the length of the array and the batch size.
배치 크기는 일반적으로 작업에서 수행되는 작업 양에 따라 선택되어야 합니다.
You should choose the batch size based on the amount of work performed in the job.
예를 들어 몇 개의 Vector3를 더하는 간단한 작업은 일반적으로 32에서 128의 배치 크기를 가질 수 있습니다.
A simple job, for example adding a couple of Vector3 to each other should have a batch size of 32 to 128.
그러나 수행되는 작업이 매우 비용이 많이 들 경우 작은 배치 크기를 사용하는 것이 좋습니다. 비용이 많이 드는 작업의 경우 배치 크기 1도 충분합니다.
However, if the work performed is very expensive then it’s best practice to use a small batch size, for example, a batch size of 1.
IJobFor는 atomic 연산을 사용하여 작업 스틸링을 수행합니다. 배치 크기는 작지만 무료가 아닙니다.
IJobFor performs work stealing using atomic operations. Batch sizes can be small but they are not for free.
반환된 JobHandle은 작업이 완료되었는지를 확인하는 데 사용할 수 있습니다.
You can use the returned JobHandle to check that the job has completed, or pass it to other jobs as a dependency.
JobHandle을 종속성으로 전달하면 작업이 워커 스레드에서 하나씩 순차적으로 실행되도록 보장됩니다.
When you pass a JobHandle as a dependency, it ensures that the jobs are executed one after another on the worker threads.
ApplyVelocityParallelForSample.cs
using UnityEngine;
using Unity.Collections;
using Unity.Jobs;

class ApplyVelocityParallelForSample : MonoBehaviour
{
    struct VelocityJob : IJobFor
    {
        // Jobs는 작업에서 액세스할 모든 데이터를 선언합니다.
        // 읽기 전용으로 선언함으로써 여러 작업이 데이터에 병렬로 액세스할 수 있습니다.
        [ReadOnly]
        public NativeArray<Vector3> velocity;

        // 기본적으로 컨테이너는 읽기 및 쓰기로 가정됩니다.
        public NativeArray<Vector3> position;

        // 델타 타임은 일반적으로 프레임의 개념이 없는 작업에서 작업이 수행됩니다.
        // 메인 스레드는 작업이 동일한 프레임 또는 다음 프레임에 실행되기를 기다립니다.
        // 그러나 작업은 워커 스레드에서 실행될 때에 프레임의 개념을 가지지 않아야 합니다.
        public float deltaTime;

        // 작업에서 실행되는 실제 코드
        public void Execute(int i)
        {
            // 델타 타임과 속도를 기반으로 위치를 이동시킵니다.
            position[i] = position[i] + velocity[i] * deltaTime;
        }
    }

    public void Update()
    {
        var position = new NativeArray<Vector3>(500, Allocator.Persistent);

        var velocity = new NativeArray<Vector3>(500, Allocator.Persistent);
        for (var i = 0; i < velocity.Length; i++)
            velocity[i] = new Vector3(0, 10, 0);

        // 작업 데이터 초기화
        var job = new VelocityJob()
        {
            deltaTime = Time.deltaTime,
            position = position,
            velocity = velocity
        };

        // 작업을 즉시 메인 스레드에서 실행하도록 예약합니다. 첫 번째 매개 변수는 각각의 반복 횟수입니다.
        job.Run(position.Length);

        // 나중에 단일 워커 스레드에서 작업을 예약합니다.
        // 첫 번째 매개 변수는 각각의 반복 횟수입니다.
        // 두 번째 매개 변수는 이 작업의 종속성에 사용할 JobHandle입니다.
        // 종속성은 작업이 종속성이 완료된 후에 워커 스레드에서 실행되도록 보장합니다.
        // 이 경우 작업이 어떤 것에도 의존하지 않기 때문에 기본 값을 사용할 수 있습니다.
        JobHandle scheduleJobDependency = new JobHandle();
        JobHandle scheduleJobHandle = job.Schedule(position.Length, scheduleJobDependency);

        // 병렬 워커 스레드에서 작업을 실행하도록 예약합니다.
        // 첫 번째 매개 변수는 각각의 반복 횟수입니다.
        // 두 번째 매개 변수는 배치 크기이며,
        // 본질적으로는 Execute(i)를 루프에서 호출하는 오버헤드가 없는 내부 루프입니다.
        // 각 반복에서 많은 작업이 있는 경우 값이 1이 합리적일 수 있습니다.
        // 매우 적은 작업이 있는 경우 32 또는 64의 값이 합리적일 수 있습니다.
        // 세 번째 매개 변수는 이 작업의 종속성에 사용할 JobHandle입니다.
        // 종속성은 작업이 종속성이 완료된 후에 워커 스레드에서 실행되도록 보장합니다.
        JobHandle scheduleParallelJobHandle = job.ScheduleParallel(position.Length, 64, scheduleJobHandle);

        // 작업이 완료될 때까지 기다립니다.
        // 작업을 즉시 완료하는 것은 권장되지 않습니다.
        // 왜냐하면 이렇게 하면이 작업과 병렬로 다른 작업이 실행되는 기회가 줄어들기 때문입니다.
        // 최적으로는 프레임 초반에 작업을 예약하고 나중에 프레임에서 기다리는 것이 좋습니다.
        scheduleParallelJobHandle.Complete();

        Debug.Log(job.position[0]);

        // Native 배열은 수동으로 해제되어야 합니다.
        position.Dispose();
        velocity.Dispose();
    }
}
요약 (Summary)
- IJob:
- 단일 스레드 방식으로 작업을 실행합니다.
- 병렬화가 필요하지 않은 작업에 적합합니다.
IJob인터페이스를 구현하며Execute()메서드를 제공합니다.
- IJobParallelFor:
- 일련의 인덱스에 대해 병렬로 작업을 실행합니다.
- 각 인덱스에 대해 병렬로 호출되는 작업에 유용합니다.
IJobParallelFor인터페이스를 구현하며Execute(int index)메서드를 제공합니다.- 지정된 범위 내의 각 인덱스에 대해
Execute메서드가 병렬로 호출됩니다.
- IJobParallelForTransform:
Transform구성 요소에 대한 병렬화된 작업을 수행하는 특수한 작업입니다.- 여러 개체의 변환에 대한 작업을 병렬화하려는 경우에 사용됩니다.
IJobParallelForTransform인터페이스를 구현하며Execute(int index, TransformAccess transform)메서드를 제공합니다.Transform구성 요소를 병렬로 수정할 수 있습니다.
- IJobFor:
- 단일 스레드 방식으로 작업을 실행하지만 인덱스의 범위를 반복합니다.
- 병렬화는 이루어지지 않지만 여러 인덱스에 대해 순차적으로 작업을 수행합니다.
IJobFor인터페이스를 구현하며Execute(int index)메서드를 제공합니다.- 지정된 범위 내의 각 인덱스에 대해
Execute메서드가 순차적으로 호출됩니다.
https://docs.unity3d.com/2023.3/Documentation/Manual/JobSystemNativeContainer.html
스레드 세이프 타입 (Thread safe types)
작업 시스템은 Burst 컴파일러와 함께 사용될 때 가장 효과적으로 작동합니다.
The job system works best when you use it with the Burst compiler.
Burst는 관리되는 객체를 지원하지 않기 때문에 작업에서 데이터에 액세스하려면 관리되지 않는 타입을 사용해야 합니다.
Because Burst doesn’t support managed objects, you need to use unmanaged types to access the data in jobs.
이를 위해 blittable 타입을 사용하거나 Unity에서 기본으로 제공하는 스레드 안전 C# 래퍼 NativeContainer 객체를 사용할 수 있습니다.
You can do this with blittable types, or use Unity’s built-in NativeContainer objects, which are a thread-safe C# wrapper for native memory.
NativeContainer 객체는 작업에서 복사본으로 작업하는 대신 Main thread와 공유하는 데이터에 액세스할 수도 있습니다.NativeContainer objects also allow a job to access data shared with the main thread rather than working with a copy.
NativeContainer 객체의 종류 (Types of NativeContainers)
Unity.Collections 네임스페이스에는 다음과 같은 기본 제공 NativeContainer 객체가 포함되어 있습니다:
The Unity.Collections namespace contains the following built-in NativeContainer objects:
- NativeArray :
관리되지 않는 배열로, 관리 코드에 네이티브 메모리 버퍼를 노출시킵니다.
An unmanaged array which exposes a buffer of native memory to managed code - NativeSlice :
특정 위치부터 특정 길이까지의NativeArray의 하위 집합을 가져옵니다.
Gets a subset of aNativeArrayfrom a particular position to a certain length.
참고
Collections package에는 추가적인 NativeContainer가 포함되어 있습니다.
The Collections package contains additional NativeContainers.
추가 유형의 전체 목록은 Collection types에서 Collections 문서를 참조하세요.
For a full list of the additional types, see the Collections documentation on Collection types.
읽기 및 쓰기 액세스 (Read and Write Access)
기본적으로 작업이 NativeContainer 인스턴스에 액세스할 때 읽기 및 쓰기 액세스 권한이 모두 부여됩니다.
By default, when a job has access to a NativeContainer instance, it has both read and write access.
이 구성은 성능을 떨어뜨릴 수 있습니다.
This configuration can slow performance.
작업 시스템은 동시에 두 개 이상의 작업이 동일한 NativeContainer 인스턴스에 쓰기 액세스하는 것을 허용하지 않기 때문입니다.
This is because the job system doesn’t allow you to schedule a job that has write access to a NativeContainer instance at the same time as another job that’s writing to it.
그러나 작업이 NativeContainer 인스턴스에 기록할 필요가 없는 경우 다음과 같이 NativeContainer를 [ReadOnly] 속성으로 표시할 수 있습니다:
However, If a job doesn’t need to write to a NativeContainer instance, you can mark the NativeContainer with the [ReadOnly] attribute, like so:
[ReadOnly]
public NativeArray<int> input;
위의 예에서는 첫 번째 NativeArray에 대한 읽기 전용 액세스 권한이 있는 다른 작업과 동시에 작업을 실행할 수 있습니다.
In the above example, you can execute the job at the same time as other jobs that also have read-only access to the first NativeArray.
메모리 할당자 (Memory Allocators)
NativeContainer 인스턴스를 생성할 때는 필요한 메모리 할당 유형을 지정해야 합니다.
When you create a NativeContainer instance, you must specify the memory allocation type that you need.
사용하는 할당 유형은 해당 네이티브 컨테이너를 얼마 동안 유지하고 싶은지에 따라 다릅니다.
The allocation type you use depends on how long you would like to keep the native container available for.
이렇게 함으로써 각 상황에서 최상의 성능을 얻을 수 있습니다.
This way you can tailor the allocation to get the best performance possible in each situation.
NativeContainer 메모리 할당 및 해제에는 세 가지 Allocator 유형이 있습니다.
There are three Allocator types for NativeContainer memory allocation and release.
NativeContainer 인스턴스를 인스턴스화할 때 적절한 것을 지정해야 합니다:
You must specify the appropriate one when instantiating a NativeContainer instance:
- Allocator.Temp:
- 가장 빠른 할당 방식입니다.
The fastest allocation. - 수명이 한 프레임 이하인 할당에 사용합니다.
Use it for allocations with a lifespan of one frame or fewer. - Temp를 사용하여 작업의 멤버 필드에 저장된 NativeContainer instance로 할당을 전달할 수 없습니다.
You can’t use Temp to pass allocations to NativeContainer instances stored in a job’s member field.
- 가장 빠른 할당 방식입니다.
- Allocator.TempJob:
- Temp보다는 느린 할당 방식이지만 Persistent보다는 빠릅니다. (중간)
A slower allocation than Temp but faster than Persistent. - 최대 4프레임 동안의 수명을 가진 스레드 안전한 할당에 사용합니다.
Use it for thread-safe allocations within a lifespan of four frames. - 중요: 이 할당 유형은 4프레임 이내에 Dispose해야 하며, 그렇지 않으면 콘솔에 경고가 표시되며 네이티브 코드에서 생성됩니다.
Important: You must Dispose of this allocation type within four frames, or the console prints a warning, generated from the native code.
대부분의 작은 작업은 이 할당 유형을 사용합니다.
Most small jobs use this allocation type.
- Temp보다는 느린 할당 방식이지만 Persistent보다는 빠릅니다. (중간)
- Allocator.Persistent:
- 가장 느린 할당 방식이지만 필요한 경우 응용 프로그램 수명 전체 또는 필요한 기간 동안 지속될 수 있습니다.
The slowest allocation but can last as long as you need it to, and if necessary, throughout the application’s lifetime. - malloc에 직접 호출하는 래퍼입니다.
It’s a wrapper for a direct call to malloc. - 긴 작업에는 이 NativeContainer 할당 유형을 사용할 수 있습니다.
Longer jobs can use this NativeContainer allocation type.
성능이 중요한 경우에는 Persistent를 사용하지 않는 것이 좋습니다.
Don’t use Persistent where performance is essential.
- 가장 느린 할당 방식이지만 필요한 경우 응용 프로그램 수명 전체 또는 필요한 기간 동안 지속될 수 있습니다.
예를 들어 :
NativeArray<float> result = new NativeArray<float>(1, Allocator.TempJob);
참고 : 위의 예제에서 숫자 1은 NativeArray의 크기를 나타냅니다. 이 경우 결과에 저장되는 데이터가 하나이므로 배열 요소가 하나만 있습니다.
Note: The number 1 in the example above indicates the size of the NativeArray. In this case, it has only one array element because it only stores one piece of data in its result.
NativeContainer 안전 시스템 (NativeContainer safety system)
안전 시스템은 모든 NativeContainer 인스턴스에 내장되어 있습니다.
The safety system is built into all NativeContainer instances.
이 시스템은 어떤 NativeContainer 인스턴스에 대한 읽기 또는 쓰기를 추적하고
It tracks what reads or writes to any NativeContainer instance,
이 정보를 사용하여 여러 작업 및 스레드에서 NativeContainer의 사용에 특정 규칙을 강제합니다.
이로써 NativeContainer는 다중 작업 및 스레드에서 결정론적으로 작동하도록 보장됩니다. (동일한 입력에 대해 동일한 출력을 생성)
and uses that information to enforce certain rules on the use of NativeContainers that makes them behave in a deterministic way across multiple jobs and threads.
예를 들어, 두 개의 독립적인 예약 작업이 동일한 NativeArray에 쓰기를 시도하면 예측할 수 없기 때문에 이는 안전하지 않습니다.
For example, if two independent scheduled jobs write to the same NativeArray, this is unsafe because you can’t predict which job executes first.
어떤 작업이 먼저 실행될지 예측할 수 없으므로 두 작업 중 어떤 것이 다른 작업에서의 데이터를 덮어쓸지 알 수 없습니다.
This means that you won’t know which of the jobs will overwrite data from the other.
두 번째 작업을 예약할 때, 안전 시스템은 문제를 설명하는 명확한 오류 메시지와 문제를 해결하는 방법을 제시하는 예외를 throw합니다.
The safety system throws an exception with a clear error message that explains why and how to solve the problem, when you schedule the second job.
만약 동일한 NativeContainer 인스턴스에 쓰기 작업을 하는 두 작업을 예약하려면, 작업을 종속성을 가지도록 예약할 수 있습니다.
If you want to schedule two jobs that write to the same NativeContainer instance, you can schedule the jobs with a dependency.
첫 번째 작업이 NativeContainer에 쓰기를 수행하고 나면 다음 작업이 동일한 NativeContainer에 안전하게 읽기 및 쓰기를 수행합니다.
The first job writes to the NativeContainer, and once it has finished executing, the next job safely reads and writes to that same NativeContainer.
종속성을 도입함으로써 작업이 항상 일관된 순서로 실행되고 NativeContainer의 결과 데이터가 결정론적으로 유지됩니다.
Introducing the dependency guarantees that the jobs always execute in a consistent order and that the resulting data in the NativeContainer is deterministic.
안전 시스템은 여러 작업이 동시에 동일한 데이터를 읽을 수 있도록 허용합니다.
The safety system allows multiple jobs to read from the same data in parallel.
이러한 읽기 및 쓰기 제한은 데이터에 메인 스레드에서 액세스할 때도 적용됩니다.
These read and write restrictions also apply when accessing data from the main thread.
예를 들어, NativeContainer에 쓰기를 완료하기 전에 해당 NativeContainer의 내용을 읽으려고 하면 안전 시스템에서 오류가 발생합니다.
For example, if you try to read the contents of a NativeContainer before the job that writes to it has completed, the safety system throws an error.
마찬가지로 해당 NativeContainer에 대해 아직 처리되지 않은 읽기 또는 쓰기 작업이 있는 동안 해당 NativeContainer에 쓰려고 하면 안전 시스템에서도 오류가 발생합니다.
Likewise, if you try to write to a NativeContainer while there are still pending jobs that read or write to it, then the safety system also throws an error.
또한 NativeContainers는 ref return을 구현하지 않기 때문에 NativeContainer의 내용을 직접 변경할 수 없습니다.
Also, because NativeContainers don’t implement ref return, you can’t directly change the contents of a NativeContainer.
예를 들어 nativeArray[0]++;는 var temp = nativeArray[0]; temp++;와 동일하며, 이는 nativeArray의 값이 업데이트되지 않습니다.
For example, nativeArray[0]++; is the same as writing var temp = nativeArray[0]; temp++; which doesn’t update the value in nativeArray.
대신, 해당 인덱스의 데이터를 지역 임시 복사본으로 복사하고 해당 복사본을 수정한 다음 다시 저장해야 합니다.
Instead, you must copy the data from the index into a local temporary copy, modify that copy, and save it back. For example:
예를 들면:
MyStruct temp = myNativeArray[i];
temp.memberVariable = 0;
myNativeArray[i] = temp;
추가 리소스 (Additional resources)
커스텀 NativeContainer 구현
Implement a custom NativeContainer
https://docs.unity3d.com/2023.3/Documentation/Manual/job-system-custom-nativecontainer.html
커스텀 네이티브 컨테이너 구현 (Implement a custom native container)
사용자 정의 네이티브 컨테이너를 구현하려면 해당 유형에 NativeContainer 속성을 부여해야 합니다.
To implement a custom native container, you must annotate your type with the the NativeContainer attribute.
또한 네이티브 컨테이너가 안전 시스템과 통합되는 방식을 이해해야 합니다.
You should also understand how native containers are integrated with the safety system.
구현해야 할 두 가지 주요 요소가 있습니다:
There are two major elements to implement:
- 사용 추적(Usage Tracking) :
- Unity가
NativeContainer인스턴스를 사용하는 예약된 작업을 추적하도록 허용하여
두 작업이 동시에 동일한 네이티브 컨테이너에 쓰기를 시도하는 등의 충돌을 감지하고 방지합니다.
Allows Unity to keep track of scheduled jobs that use aNativeContainerinstance,
so that it can detect and prevent potential conflicts, such as two jobs writing to the same native container at the same time.
- Unity가
- 누수 추적(Leak Tracking) :
NativeContainer가 제대로 Dispose되지 않은 경우를 감지합니다.
Detects when aNativeContainerisn’t disposed of properly.
이러한 상황에서는 메모리 누수가 발생하여NativeContainer에 할당된 메모리가 프로그램의 나머지 수명 동안 사용할 수 없게 됩니다.
In this situation, a memory leak happens, where the memory allocated to theNativeContainerbecomes unavailable for the entire remaining lifetime of the program.
사용량 추적 구현 (Implement usage tracking)
사용 추적을 구현하려면 코드에서 AtomicSafetyHandle 클래스를 사용합니다.
To access usage tracking in your code, use the AtomicSafetyHandle class.
AtomicSafetyHandle은 주어진 NativeContainer에 대해 안전 시스템이 저장하는 중앙 정보에 대한 참조를 보유하며, NativeContainer의 메서드가 안전 시스템과 상호 작용하는 주요 방법입니다. AtomicSafetyHandle holds a reference to the central information that the safety system stores for a given NativeContainer,
and is the main way that the methods of a NativeContainer interact with the safety system.
따라서 모든 NativeContainer 인스턴스는 m_Safety라는 이름의 AtomicSafetyHandle 필드를 포함해야 합니다.
Because of this, every NativeContainer instance must contain an AtomicSafetyHandle field named m_Safety.
각 AtomicSafetyHandle은 현재 컨텍스트에서 NativeContainer에 수행할 수 있는 작업 유형을 나타내는 플래그 집합을 저장합니다.
Each AtomicSafetyHandle stores a set of flags that indicate what types of operation can be performed on the native container in the current context.
작업이 NativeContainer 인스턴스를 포함하는 경우 작업 시스템은 자동으로 AtomicSafetyHandle의 플래그를 구성하여
해당 작업에서 NativeContainer를 사용할 수 있는 방식을 반영합니다.
When a job contains a NativeContainer instance, the job system automatically configures
the flags in the AtomicSafetyHandle to reflect the way that the native container can be used in that job.
작업이 NativeContainer 인스턴스에서 읽기를 시도할 때 작업 시스템은 읽기 전에 CheckReadAndThrow 메서드를 호출하여
작업이 NativeContainer에 대한 읽기 액세스 권한이 있는지 확인합니다.
When a job tries to read from a NativeContainer instance, the job system calls the CheckReadAndThrow method before reading,
to confirm that the job has read access to the native container.
마찬가지로 작업이 NativeContainer에 쓰기를 시도할 때 작업 시스템은 쓰기 전에 CheckWriteAndThrow를 호출하여
작업이 NativeContainer에 대한 쓰기 액세스 권한이 있는지 확인합니다.
Similarly, when a job tries to write to a native container, the job system calls CheckWriteAndThrow before writing, to check that the job has write access to the native container.
두 작업이 동일한 NativeContainer 인스턴스를 할당 받은 경우에도, 해당 네이티브 컨테이너에 대해 별도의 AtomicSafetyHandle 객체를 갖습니다.
Two jobs that have been assigned the same NativeContainer instance have separate AtomicSafetyHandle objects for that native container,
따라서 두 작업은 동일한 중앙 정보를 참조하더라도,
각각이 네이티브 컨테이너에 대한 읽기 및 쓰기 액세스를 나타내는 별도의 플래그를 유지할 수 있습니다.
so although they both reference the same set of central information,
they can each hold separate flags that indicate what read and write access each job has to the native container.
누출 추적 구현 (Implement leak tracking)
Unity’s native code는 주로 누수 추적을 구현합니다.
Unity’s native code primarily implements leak tracking.
UnsafeUtility.MallocTracked 메서드를 사용하여 NativeContainer 데이터를 저장하는 데 필요한 메모리를 할당하고,
이를 해제하기 위해 UnsafeUtility.FreeTracked를 사용합니다.
It uses the UnsafeUtility.MallocTracked method to allocate the memory needed to store NativeContainer data,
and then uses UnsafeUtility.FreeTracked to dispose of it.
이전 유니티 버전에서는 DisposeSentinel 클래스가 누수 추적을 제공했습니다.
In earlier versions of Unity the DisposeSentinel class provides leak tracking.
가비지 컬렉터가 DisposeSentinel 객체를 수집할 때 유니티는 메모리 누수를 보고합니다.
Unity reports a memory leak when the garbage collector collects the DisposeSentinel object.
DisposeSentinel을 만들려면 Create 메서드를 사용하며, 이 메서드를 사용하면 AtomicSafetyHandle을 동시에 초기화할 필요가 없습니다.
To create a DisposeSentinel, use the Create method, which also initializes the AtomicSafetyHandle at the same time.
ativeContainer가 Dispose될 때 Dispose 메서드는 DisposeSentinel과 AtomicSafetyHandle을 한 번에 처리합니다.
When the NativeContainer is disposed of, the Dispose method disposes of both the DisposeSentinel and the AtomicSafetyHandle in a single call.
누수가 발생한 NativeContainer가 생성된 위치를 식별하려면 메모리가 원래 할당된 위치의 스택 트레이스를 캡처할 수 있습니다.
To identify where the leaked NativeContainer was created, you can capture the stack trace of where the memory was originally allocated.
이를 위해 NativeLeakDetection.Mode 속성을 사용하고 에디터에서는
Preferences > Jobs > Leak Detection Level로 이동하여 필요한 누수 검출 수준을 선택할 수 있습니다.
To do this, use the NativeLeakDetection.Mode property. You can also access this property in the Editor.
To do this, go to Preferences > Jobs > Leak Detection Level and choose the leak detection level you need.
중첩된 네이티브 컨테이너 (Nested native containers)
안전 시스템은 작업에서 중첩된 NativeContainer를 지원하지 않습니다.
The safety system doesn’t support nested native containers in jobs,
To prevent scheduling jobs that use nested native containers, use SetNestedContainer, which flags a NativeContainer as nested when they contain other NativeContainer instances.
이는 작업 시스템이 큰 NativeContainer 인스턴스 내의 각 개별 NativeContainer에 대한 AtomicSafetyHandle을 올바르게 구성할 수 없기 때문입니다.
because the job system can’t correctly configure the AtomicSafetyHandle for each individual NativeContainer inside the larger NativeContainer instance.
중첩된 NativeContainer를 사용하는 작업을 예약하지 않도록 방지하려면 SetNestedContainer 플래그를 사용하십시오.
To prevent scheduling jobs that use nested native containers, use SetNestedContainer,
이 메서드는 다른 NativeContainer 인스턴스를 포함할 때 해당 NativeContainer를 중첩된 것으로 플래그 지정합니다.
which flags a NativeContainer as nested when they contain other NativeContainer instances.
안전 ID 및 오류 메시지 (Safety IDs and error messages)
Safety system은 코드가 안전성 제약을 준수하지 않을 때 발생하는 오류 메시지를 제공합니다.
The safety system provides error messages that indicate when your code doesn’t adhere to safety constraints.
오류 메시지를 더 명확하게 만들기 위해 NativeContainer 객체의 이름을 safety system에 등록할 수 있습니다.
To help make the error messages clearer, you can register a NativeContainer object’s name with the safety system.
이름을 등록하려면 NewStaticSafetyId를 사용하고, 이는 SetStaticSafetyId에 전달할 safety ID를 반환합니다.
To register a name, use NewStaticSafetyId, which returns a safety ID that you can pass to SetStaticSafetyId.
한 번 safety ID를 생성하면 NativeContainer의 모든 인스턴스에서 재사용할 수 있으므로
주로 컨테이너 클래스의 정적 멤버에 저장하는 것이 일반적인 패턴입니다.
Once you create a safety ID, you can reuse it for all instances of the NativeContainer,
so a common pattern is to store it in a static member of the container class.
또한 SetCustomErrorMessage를 사용하여 특정 안전성 제약 위반에 대한 사용자 지정 오류 메시지를 재정의할 수도 있습니다.
You can also override the error messages for specific safety constraint violations with SetCustomErrorMessage.
추가 리소스 (Additional resources)
https://docs.unity3d.com/2023.3/Documentation/Manual/job-system-copy-nativecontainer.html
NativeContainer 구조 복사 (Copying NativeContainer structures)
Native containers는 값 타입이기 때문에 변수에 할당될 때 Unity는 NativeContainer 구조체를 복사합니다.
Native containers are value types, which means that when they’re assigned to a variable, Unity copies the NativeContainer structure,
이 구조체에는 네이티브 컨테이너의 데이터가 저장된 위치를 가리키는 포인터와 함께 해당 컨테이너의 AtomicSafetyHandle도 포함되어 있습니다.
which contains pointers to where the native container’s data is stored, including its AtomicSafetyHandle.
하지만 전체 NativeContainer 내용을 복사하지는 않습니다.
It doesn’t copy the entire contents of the NativeContainer.
이러한 시나리오는 동일한 메모리 영역을 참조하는 여러 NativeContainer 구조체 사본이 있을 수 있으며,
모두 동일한 중앙 레코드를 참조하는 AtomicSafetyHandle 객체를 포함하고 있을 수 있음을 의미합니다.
This scenario means that there might be multiple copies of a NativeContainer structure which all reference the same region of memory,
and all contain AtomicSafetyHandle objects which reference the same central record.
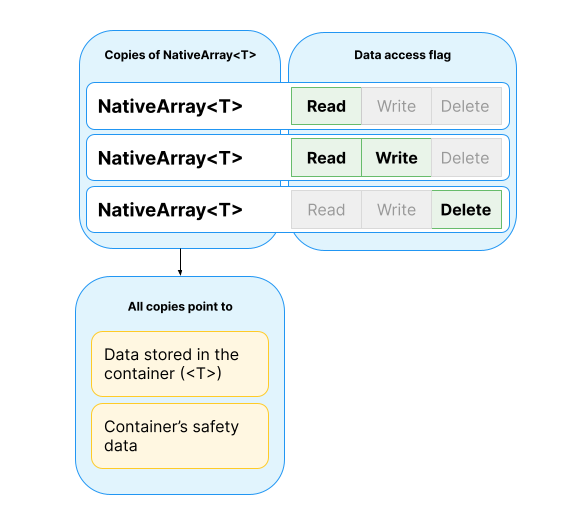
How copies of NativeContainer objects work
위 다이어그램은 실제로 동일한 컨테이너를 나타내는 NativeArray 구조체의 세 가지 다른 복사본을 보여줍니다.
The above diagram shows three different copies of a NativeArray structure that all represent the same actual container.
각 복사본은 동일한 저장된 데이터와 원래 NativeArray와 동일한 안전성 데이터를 가리킵니다.
Each copy points to the same stored data, and the same safety data as the original NativeArray.
그러나 각 NativeArray 복사본은 해당 복사본에서 작업을 수행할 수 있는 지를 나타내는 다른 플래그를 갖습니다.
However, each copy of the NativeArray has different flags that indicate what a job is allowed to do with that copy.
안전성 데이터에 대한 포인터와 플래그는 AtomicSafetyHandle를 구성합니다.
The pointer to the safety data, combined with the flags, make up the AtomicSafetyHandle.
버전 번호 (Version numbers)
만약 NativeContainer가 dispose(해제)되면 NativeContainer구조체의 모든 복사본은 기존의 NativeContainer가 무효임을 인식해야 합니다.
If a NativeContainer is disposed of, all the copies of the NativeContainer structure must recognize that the original NativeContainer is invalid.
원래 NativeContainer를 dispose하는 것은 NativeContainer의 데이터를 저장하던 메모리 블록이 할당 해제되었음을 의미합니다.
Disposing of the original NativeContainer means that the block of memory that used to hold the data for the NativeContainer has been deallocated.
이 상황에서 각 NativeContainer 복사본에 저장된 데이터에 대한 포인터는 무효화되어 있으며 사용 시 액세스 위반을 일으킬 수 있습니다.
In this situation, the pointer to the data which is stored in each copy of the NativeContainer is invalid, and might cause access violations if you use it.
또한 AtomicSafetyHandle는 무효화된 NativeContainer 인스턴스를 가리키는 중앙 레코드를 가리킵니다.
The AtomicSafetyHandle also points at a central record which becomes invalid for the NativeContainer instances.
그러나 safety system은 중앙 레코드의 메모리를 해제하지 않으므로 액세스 위반의 위험을 피할 수 있습니다.
However, the safety system never deallocates the memory for the central record, so it avoids the risk of access violations.
대신, 각 레코드에는 버전 번호가 포함되어 있습니다.
Instead, each record contains a version number.
버전 번호의 복사본은 해당 기록을 참조하는 각 AtomicSafetyHandle 안에 저장됩니다.
A copy of the version number is stored inside each AtomicSafetyHandle that references that record.
NativeContainer가 dispose되면 Unity는 Release()를 호출하며 이는 중앙 레코드의 버전 번호를 증가시킵니다.
When a NativeContainer is disposed of, Unity calls Release(), which increments the version number on the central record.
그 후 해당 레코드는 다른 NativeContainer 인스턴스에 재사용될 수 있습니다.
After this, the record can be reused for other NativeContainer instances.
남아 있는 각 AtomicSafetyHandle는 저장된 버전 번호를 중앙 레코드의 버전 번호와 비교하여 NativeContainer가 dispose되었는지를 테스트합니다.
Each remaining AtomicSafetyHandle compares its stored version number against the version number in the central record to test whether the NativeContainer has been disposed of.
Unity는 이 테스트를 자동으로 수행하여 CheckReadAndThrow, CheckWriteAndThrow 등의 메서드 호출 일부의 일환으로 처리합니다.
Unity performs this test automatically as part of calls to methods such as CheckReadAndThrow, and CheckWriteAndThrow.
동적 네이티브 컨테이너의 정적 보기 (Static views of dynamic native containers)
동적 NativeContainer는 계속해서 요소를 추가할 수 있는 변수 크기를 가진 컨테이너로, Collections 패키지에서 제공되는 NativeList<T>와 같은 예시가 있습니다.
A dynamic native container is one which has a variable size that you can continue to add elements to, such as NativeList<T> (which is available in the Collections package).
이는 크기를 변경할 수 없는 고정 크기의 NativeArray<T>와 같은 정적 NativeContainer 대조적입니다.
This is in contrast to a static native container like NativeArray<T>, which has a fixed size that you can’t change.
동적 네이티브 컨테이너를 사용할 때 뷰(view)라 불리는 다른 인터페이스를 통해 데이터에 직접 액세스할 수도 있습니다.
When you use a dynamic native container, you can also directly access its data through another interface, called a view.
뷰는 NativeContainer 객체의 데이터에 복사하거나 소유권을 얻지 않고 별칭(alias)을 제공합니다.
A view allows you to alias a NativeContainer object’s data without copying or taking ownership of the data.
뷰의 예시로는 열거자(enumerator) 객체가 있습니다.
Examples of views include enumerator objects,
이를 사용하여 네이티브 컨테이너의 데이터에 요소별로 액세스할 수 있으며 NativeList<T>.AsArray와 같은 메서드를 사용하여 NativeList를 NativeArray처럼 처리할 수 있습니다.
which you can use to access the data in a native container element-by-element, and methods such as NativeList<T>.AsArray, which you can use to treat a NativeList as if it were a NativeArray.
그러나 동적 네이티브 컨테이너의 크기가 변경되면 뷰가 일반적으로 스레드 안전하지 않습니다.
Views aren’t typically thread safe if the size of the dynamic native container changes.
이는 NativeContainer 의 크기가 변경되면 Unity가 메모리에서 데이터를 재배치하고,
This is because when the size of the native container changes, Unity relocates where the data is stored in memory,
이로 인해 뷰가 저장하는 포인터가 무효화되기 때문입니다.
which causes any pointers that a view stores to become invalid.
보조 버전 번호 (Secondary version numbers)
동적 네이티브 컨테이너의 크기가 변경되는 상황을 지원하기 위해 안전성 시스템은 AtomicSafetyHandle 에 보조 버전 번호를 포함합니다.
To support situations when the size of the dynamic native container changes, the safety system includes a secondary version number in an AtomicSafetyHandle.
이 메커니즘은 버전 관리 메커니즘과 유사하지만 첫 번째 버전 번호와 독립적으로 증가시킬 수 있는 중앙 레코드에 저장된 두 번째 버전 번호를 사용합니다.
This mechanism is similar to the versioning mechanism, but uses a second version number stored in the central record which can be incremented independently of the first version number.
보조 버전 번호를 사용하려면 UseSecondaryVersion을 사용하여 NativeContainer에 저장된 데이터에 대한 뷰를 구성할 수 있습니다.
To use a secondary version number, you can use UseSecondaryVersion to configure the views into the data stored in a NativeContainer.
NativeContainer의 크기를 변경하거나 기존 뷰를 무효화하는 작업에 대해 CheckWriteAndThrow 대신 CheckWriteAndBumpSecondaryVersion을 사용합니다.
For operations that change the size of the native container, or otherwise make existing views invalid, use CheckWriteAndBumpSecondaryVersion instead of CheckWriteAndThrow.
또한 NativeContainer에 SetBumpSecondaryVersionOnScheduleWrite를 설정하여 NativeContainer에 쓰기 작업이 예약될 때마다 자동으로 뷰를 무효화해야 합니다.
You also need to set SetBumpSecondaryVersionOnScheduleWrite on the NativeContainer to automatically invalidate views whenever a job is scheduled that writes to the native container.
뷰를 만들고 AtomicSafetyHandle를 복사할 때는 CheckGetSecondaryDataPointerAndThrow 를 사용하여 NativeContainer의 메모리 포인터를 뷰로 안전하게 복사할 수 있는지 확인합니다.
When you create a view and copy the AtomicSafetyHandle to it, use CheckGetSecondaryDataPointerAndThrow to confirm that it’s safe to copy the pointer to the native container’s memory into the view.
특수 손잡이 (Special handles)
임시 네이티브 컨테이너를 사용할 때 두 가지 특수한 핸들이 있습니다 :
There are two special handles, which you can use when working with temporary native containers:
GetTempMemoryHandle:Allocator.Temp으로 할당된 NativeContainer에서 사용할 수 있는AtomicSafetyHandle을 반환합니다.
Returns anAtomicSafetyHandlewhich you can use in native containers which are allocated withAllocator.Temp.
Unity는 현재 임시 메모리 범위가 종료될 때 이 핸들을 자동으로 무효화하므로 직접 해제할 필요가 없습니다.
Unity automatically invalidates this handle when the current temporary memory scope exits, so you don’t need to release it yourself.
특정AtomicSafetyHandle이GetTempMemoryHandle에서 반환된 핸들인지 테스트하려면IsTempMemoryHandle을 사용합니다.
To test whether a particularAtomicSafetyHandleis the handle returned byGetTempMemoryHandle, useIsTempMemoryHandle.GetTempUnsafePtrSliceHandle:
안전하지 않은 메모리에서 지원되는 임시 네이티브 컨테이너에 사용할 수 있는 전역 핸들을 반환합니다.
Returns a global handle you can use for temporary native containers which are backed by unsafe memory.
예를 들어, 스택 메모리에서 생성된NativeSlice입니다.
For example, aNativeSliceconstructed from stack memory.
이 핸들을 사용하는 컨테이너를 작업에 전달할 수 없습니다.
You can’t pass containers that use this handle into jobs.
https://docs.unity3d.com/2023.3/Documentation/Manual/job-system-custom-nativecontainer-example.html
사용자 정의 NativeContainer 예제 (Custom NativeContainer example)
NativeContainer다음은 추가 전용 목록인 사용자 정의의 전체 예입니다 .
The following is a complete example of a custom NativeContainer as an append-only list.
읽기 및 쓰기 작업의 기본 보호는 물론 앨리어싱 뷰 생성 및 무효화를 보여줍니다.
It demonstrates basic protection of read and write operations, as well as creating and invalidating aliasing views.
다른 예는 NativeContainerAttribute API 설명서를 참조하세요.
For another example, see the NativeContainerAttribute API documentation.
using System;
using System.Runtime.InteropServices;
using Unity.Collections.LowLevel.Unsafe;
using Unity.Collections;

// NativeContainer로 구조체를 표시합니다. 이는 job 시스템에 AtomicSafetyHandle이 포함되어 있음을 나타냅니다.
[NativeContainer]
public unsafe struct NativeAppendOnlyList<T> : IDisposable where T : unmanaged
{
    // 원시 포인터는 일반적으로 job에 전달되는 구조체 내에서 허용되지 않지만, 안전 시스템으로 보호되므로 이 제한을 해제할 수 있습니다.
    [NativeDisableUnsafePtrRestriction]
    internal void* m_Buffer;
    internal int m_Length;
    internal Allocator m_AllocatorLabel;

    // ENABLE_UNITY_COLLECTIONS_CHECKS 정의로만 안전 시스템 멤버를 선언하고 사용해야 합니다.
    // 프로젝트의 최종 빌드에서는 성능상의 이유로 안전 시스템이 비활성화되므로 이러한 API는 해당 빌드에서 사용할 수 없습니다.
#if ENABLE_UNITY_COLLECTIONS_CHECKS

    // AtomicSafetyHandle 필드는 'm_Safety'로 정확히 명명되어야 합니다.
    internal AtomicSafetyHandle m_Safety;

    // 이 유형을 해당 유형에서 파생된 이름을 사용하여 정적으로 안전 시스템에 등록합니다.
    internal static readonly int s_staticSafetyId = AtomicSafetyHandle.NewStaticSafetyId<NativeAppendOnlyList<T>>();
#endif

    public NativeAppendOnlyList(Allocator allocator, params T[] initialItems)
    {
        m_Length = initialItems.Length;
        m_AllocatorLabel = allocator;

        // 초기 버퍼의 크기(바이트)를 계산하고 할당합니다.
        int totalSize = UnsafeUtility.SizeOf<T>() * m_Length;
        m_Buffer = UnsafeUtility.MallocTracked(totalSize, UnsafeUtility.AlignOf<T>(), m_AllocatorLabel, 1);

        // 배열에서 데이터를 버퍼로 복사합니다.
        var handle = GCHandle.Alloc(initialItems, GCHandleType.Pinned);
        try
        {
            UnsafeUtility.MemCpy(m_Buffer, handle.AddrOfPinnedObject().ToPointer(), totalSize);
        }
        finally
        {
            handle.Free();
        }

#if ENABLE_UNITY_COLLECTIONS_CHECKS
        // AtomicSafetyHandle 및 DisposeSentinel 생성
        m_Safety = AtomicSafetyHandle.Create();

        // AtomicSafetyHandle에 안전 ID 설정하여 오류 메시지가 이 컨테이너 유형을 올바르게 설명하도록 함
        AtomicSafetyHandle.SetStaticSafetyId(ref m_Safety, s_staticSafetyId);

        // 이 컨테이너가 중첩 컨테이너인지 확인하고 중첩 컨테이너 플래그 설정
        if (UnsafeUtility.IsNativeContainerType<T>())
            AtomicSafetyHandle.SetNestedContainer(m_Safety, true);
#endif
    }

    public int Length
    {
        get
        {
#if ENABLE_UNITY_COLLECTIONS_CHECKS
            // 컨테이너에 대한 정보를 읽을 수 있는지 확인합니다.
            // 이는 원시 컨테이너에서 읽을 수 없거나 네이티브 컨테이너가 해제된 경우 InvalidOperationException을 throw합니다.
            AtomicSafetyHandle.CheckReadAndThrow(m_Safety);
#endif
            return m_Length;
        }
    }

    public T this[int index]
    {
        get
        {
#if ENABLE_UNITY_COLLECTIONS_CHECKS
            // 현재 네이티브 컨테이너에서 읽을 수 있는지 확인합니다.
            AtomicSafetyHandle.CheckReadAndThrow(m_Safety);
#endif

            // 버퍼에서 값을 읽어 반환합니다.
            return UnsafeUtility.ReadArrayElement<T>(m_Buffer, index);
        }

        set
        {
#if ENABLE_UNITY_COLLECTIONS_CHECKS
            // 현재 네이티브 컨테이너에 쓸 수 있는지 확인합니다.
            AtomicSafetyHandle.CheckWriteAndThrow(m_Safety);
#endif
            // 값을 버퍼에 씁니다.
            UnsafeUtility.WriteArrayElement(m_Buffer, index, value);
        }
    }

    public void Add(T value)
    {
#if ENABLE_UNITY_COLLECTIONS_CHECKS
        // 현재 네이티브 컨테이너를 수정(쓰기)할 수 있는지 확인하고 그렇다면 보조 버전을 증가시켜서
        // 뷰가 무효화되도록 합니다. 왜냐하면 크기와 버퍼에 대한 포인터를 변경할 것이기 때문입니다.
        AtomicSafetyHandle.CheckWriteAndBumpSecondaryVersion(m_Safety);
#endif

        // 현재 버퍼를 원소 하나를 추가할 공간이 있는 새로운 버퍼로 교체합니다.
        int newTotalSize = (m_Length + 1) * UnsafeUtility.SizeOf<T>();
        void* newBuffer = UnsafeUtility.MallocTracked(newTotalSize, UnsafeUtility.AlignOf<T>(), m_AllocatorLabel, 1);
        UnsafeUtility.MemCpy(newBuffer, m_Buffer, m_Length * UnsafeUtility.SizeOf<T>());
        UnsafeUtility.FreeTracked(m_Buffer, m_AllocatorLabel);
        m_Buffer = newBuffer;

        // 새 원소를 버퍼 끝에 넣고 길이를 증가시킵니다.
        UnsafeUtility.WriteArrayElement(m_Buffer, m_Length++, value);
    }

    public NativeArray<T> AsArray()
    {
#if ENABLE_UNITY_COLLECTIONS_CHECKS
        // 현재 버퍼 포인터를 사용하여 뷰를 만들 수 있는지 안전하게 확인합니다.
        AtomicSafetyHandle.CheckGetSecondaryDataPointerAndThrow(m_Safety);

        // AtomicSafetyHandle의 복사본을 만들고 해당 복사본을 기본 대신 보조 버전을 사용하도록 표시합니다.
        AtomicSafetyHandle handleForArray = m_Safety;
        AtomicSafetyHandle.UseSecondaryVersion(ref handleForArray);
#endif

        // 현재 크기를 사용하여 버퍼에 별칭을 설정하는 새 NativeArray를 만듭니다.
        // 이 작업은 데이터를 할당하거나 복사하지 않고 현재 버퍼를 가리키는 NativeArray<T>를 설정합니다.
        var array = NativeArrayUnsafeUtility.ConvertExistingDataToNativeArray<T>(m_Buffer, m_Length, Allocator.None);

#if ENABLE_UNITY_COLLECTIONS_CHECKS
        // 새로 만든 NativeArray에 AtomicSafetyHandle을 설정합니다. 설정한 핸들은 앞서 복사한 핸들을 사용합니다.
        NativeArrayUnsafeUtility.SetAtomicSafetyHandle(ref array, handleForArray);
#endif

        return array;
    }

    public void Dispose()
    {
#if ENABLE_UNITY_COLLECTIONS_CHECKS
        AtomicSafetyHandle.CheckDeallocateAndThrow(m_Safety);
        AtomicSafetyHandle.Release(m_Safety);
#endif

        // 버퍼를 해제합니다.
        UnsafeUtility.FreeTracked(m_Buffer, m_AllocatorLabel);
        m_Buffer = null;
        m_Length = 0;
    }
}
https://docs.unity3d.com/2023.3/Documentation/Manual/JobSystemCreatingJobs.html
작업 생성 및 실행 (Create and run a job)
작업 생성 및 실행을 성공적으로 수행하려면 다음과 같은 단계를 따라야 합니다 :
To create and successfully run a job, you must do the following:
- 작업 생성 :
IJob인터페이스를 구현합니다.
Implement theIJobinterface. - 작업 예약 :
작업에 대한Schedule메서드를 호출합니다.
Call theSchedulemethod on the job. - 작업 완료 대기 :
작업이 이미 완료된 경우 즉시 반환되며, 데이터에 액세스하려면 작업에 대한Complete메서드를 호출합니다.
It returns immediately if the job is already complete, and you can call theCompletemethod on the job when you want to access the data.
작업 생성 (Create a job)
Unity에서 작업을 생성하려면 IJob 인터페이스를 구현합니다.
To create a job in Unity, implement the IJob interface.
IJob 구현을 사용하여 병렬로 실행되는 다른 작업과 함께 단일 작업을 예약할 수 있습니다.
You can use your IJob implementation to schedule a single job that runs in parallel to any other jobs that are running.
IJob은 Execute라는 하나의 필수 메서드를 갖추고 있으며, 이 메서드는 작업이 실행되는 동안 worker thread가 호출하는 메서드입니다.IJob has one required method: Execute, which Unity invokes whenever a worker thread runs the job.
작업을 생성할 때 해당 작업에 대한 JobHandle도 생성할 수 있으며, 다른 메서드에서 작업을 참조하는 데 사용됩니다.
When you create a job, you can also create a JobHandle for it, which other methods need to use to reference the job.
중요 (Important:) :
작업 내에서 readonly가 아닌 또는 가변적인 static 데이터에 액세스하는 것에 대한 보호가 없습니다.
There’s no protection against accessing non-readonly or mutable static data from within a job.
이러한 종류의 데이터에 액세스하는 것은 모든 안전 시스템을 우회하며 응용 프로그램이나 Unity 에디터를 충돌시킬 수 있습니다.
Accessing this kind of data circumvents all safety systems and might crash your application or the Unity Editor.
Unity가 실행될 때 작업 시스템은 예약된 작업 데이터의 복사본을 만들어 여러 스레드가 동일한 데이터를 읽거나 쓰지 못하도록 합니다.
When Unity runs, the job system makes a copy of scheduled job data, which prevents more than one thread from reading or writing the same data.
작업이 완료된 후에는 NativeContainer에 쓰여진 데이터만 액세스할 수 있습니다.
Only data written to a NativeContainer can be accessed after the job finishes.
이는 작업이 사용하는 NativeContainer의 복사본과 원래 NativeContainer 객체가 동일한 메모리를 가리키기 때문입니다.
This is because both the copy of the NativeContainer that the job uses and the original NativeContainer object point to the same memory.
자세한 내용은 쓰레드 안전한 유형에 대한 문서를 참조하세요.
For more information, see the documentation on Thread safe types.
작업 시스템이 작업을 작업 큐에서 가져오면 Execute 메서드를 단일 스레드에서 한 번 실행합니다.
When the job system picks up a job from its job queue, it runs the Execute method once on a single thread.
일반적으로 작업 시스템은 백그라운드 스레드에서 작업을 실행하지만, 만약 메인 스레드가 유휴 상태가 되면 메인 스레드에서도 실행될 수 있습니다.
Typically, the job system runs jobs on background threads, but it can choose the main thread if it becomes idle.
따라서 작업을 한 프레임 내에 완료되도록 설계해야 합니다.
For this reason, you should design your jobs to complete in under a frame.
작업 예약 (Schedule a job)
작업을 예약하려면 Schedule을 호출하세요.
To schedule a job, call Schedule.
이렇게 하면 작업이 작업 큐에 들어가며 작업 시스템은 해당 작업의 모든 종속성(있는 경우)이 완료되면 작업을 실행하기 시작합니다.
This puts the job into the job queue, and the job system begins executing the job once all its dependencies, if any, complete.
예약되면 작업을 중단할 수 없습니다. Schedule은 주 스레드에서만 호출할 수 있습니다.
Once scheduled, you can’t interrupt a job. You can only call Schedule from the main thread.
팁 (Tip) :
작업에는 주 스레드에서 즉시 작업을 실행하는 데 사용할 수 있는 Run 메서드가 있습니다.
Jobs have a Run method that you can use in place of Schedule to immediately execute the job on the main thread.
이는 디버깅 목적으로 사용할 수 있습니다.
You can use this for debugging purposes.
작업 완료 (Complete the job)
Schedule을 호출하고 작업 시스템이 작업을 실행한 후에는 작업에 대한 JobHandle에서 Complete 메서드를 호출하여 데이터에 액세스할 수 있습니다.
Once you call Schedule and the job system has executed a job, you can call the Complete method on the JobHandle to access the data in the job.
Complete 를 호출하는 것은 코드에서 가능한 늦게 호출하는 것이 좋습니다.
It’s best practice to call Complete as late as possible in your code.
Complete를 호출하면 메인 스레드가 작업이 사용했던 NativeContainer 인스턴스에 안전하게 액세스할 수 있습니다.
When you call Complete, the main thread can safely access the NativeContainer instance that the job was using.
Complete 를 호출하면 안전 시스템의 상태도 정리됩니다.
Calling Complete also cleans up the state in the safety system.
이를 하지 않으면 메모리 누수가 발생할 수 있습니다.
Not doing so introduces a memory leak.
잡 예시 (Job examples)
다음은 두 개의 부동 소수점 값을 더하는 작업의 예시입니다.
The following is an example of a job that adds two floating point values together.
이 작업은 IJob을 구현하며, 작업 결과를 얻기 위해 NativeArray를 사용하며, 작업 구현은 Execute 메서드 내에 포함되어 있습니다 :
It implements IJob, uses a NativeArray to get the results of the job, and uses the Execute method with the implementation of the job inside it:
using UnityEngine;
using Unity.Collections;
using Unity.Jobs;

// Job adding two floating point values together
public struct MyJob : IJob
{
    public float a;
    public float b;
    public NativeArray<float> result;

    public void Execute()
    {
        result[0] = a + b;
    }
}
다음 예제는 MyJob기본 스레드에서 작업을 예약하기 위해 작업을 기반으로 합니다.
The following example builds on the MyJob job to schedule a job on the main thread:
using UnityEngine;
using Unity.Collections;
using Unity.Jobs;

public class MyScheduledJob : MonoBehaviour
{
    // 결과를 저장할 단일 float의 NativeArray 를 생성합니다.
    // NativeArray만이 작업 결과를 얻을 수 있는 유일한 방법입니다
    // 하나의 값 또는 일련의 값을 얻게 됩니다.
    NativeArray<float> result;
    // Create a JobHandle for the job
    JobHandle handle;

    // Set up the job
    public struct MyJob : IJob
    {
        public float a;
        public float b;
        public NativeArray<float> result;

        public void Execute()
        {
            result[0] = a + b;
        }
    }

    // 업데이트는 프레임당 1회 호출
    void Update()
    {
        // Set up the job data
        result = new NativeArray<float>(1, Allocator.TempJob);

        MyJob jobData = new MyJob
        {
            a = 10,
            b = 10,
            result = result
        };

        // Schedule the job
        handle = jobData.Schedule();
    }

    private void LateUpdate()
    {
        // 나중에 프레임에서 작업이 완료될 때까지 기다렸다가 결과에 액세스합니다.
        handle.Complete();

        // NativeArray의 모든 복사본은 동일한 메모리를 가리키며,
        // NativeArray의 "당신의" 복사본에서 결과에 액세스할 수 있습니다
        // float aPlusB = result[0];

        // 할당된 메모리를 해제합니다.
        result.Dispose();
    }
}
예약 및 완료 모범적인 사례 (Schedule and Complete best practices)
작업이 필요한 데이터가 준비되면 즉시 해당 작업에 Schedule을 호출하고, 결과가 필요한 시점까지 Complete를 호출하지 않는 것이 좋은 실천 방법입니다.
It’s best practice to call Schedule on a job as soon as you have the data it needs, and don’t call Complete on it until you need the results.
덜 중요한 작업은 더 중요한 작업과 경쟁하지 않는 프레임 부분에 예약하는 것이 좋습니다.
You can schedule less important jobs in a part of the frame where they aren’t competing with more important jobs.
예를 들어, 한 프레임이 끝나고 다음 프레임이 시작하기 전에 작업이 실행되지 않는 기간이 있고,
For example, if there is a period between the end of one frame and the beginning of the next frame where no jobs are running,
한 프레임의 지연이 허용되는 경우, 해당 작업을 프레임 끝 부분에 예약하고 결과를 다음 프레임에서 사용할 수 있습니다.
and a one frame latency is acceptable, you can schedule the job towards the end of a frame and use its results in the following frame.
반대로 응용 프로그램이 해당 변경 기간을 다른 작업으로 가득 채우고 프레임의 다른 곳에서 미사용 기간이 있는 경우 해당 부분에 작업을 예약하는 것이 더 효율적입니다.
Alternatively, if your application saturates that changeover period with other jobs, and there’s an under-utilized period somewhere else in the frame,
it’s more efficient to schedule your job there instead.
Profiler를 사용하여 Unity가 작업 완료를 대기하는 위치를 확인할 수도 있습니다.
You can also use the Profiler to see where Unity is waiting for jobs to complete.
주 스레드에서 WaitForJobGroupID 마커가 이를 나타냅니다.
The marker WaitForJobGroupID on the main thread indicates this.
이 마커는 데이터 의존성을 도입한 것으로 간주될 수 있어 이를 해결해야 할 수도 있습니다.
This marker might mean that you’ve introduced a data dependency somewhere that you should resolve.
데이터 의존성이 메인 스레드를 대기하게 만드는 위치를 추적하려면 JobHandle.Complete를 찾아보세요.
Look for JobHandle.Complete to track down where you have data dependencies that are forcing the main thread to wait.
장기 실행 작업 사용 방지 (Avoid using long running jobs)
쓰레드와 달리 job들은 실행을 양보하지 않습니다.
Unlike threads, jobs don’t yield execution.
한 번 작업이 시작되면 해당 작업 워커 쓰레드는 다른 작업을 실행하기 전에 해당 작업을 완료하기로 약속합니다.
Once a job starts, that job worker thread commits to completing the job before running any other job.
따라서 시스템의 다른 작업에 비해 오랜 시간이 걸리는 작업을 전송하는 대신 서로 의존하는 작은 작업으로 긴 작업을 분할하는 것이 좋은 실천 방법입니다.
As such, it’s best practice to break up long running jobs into smaller jobs that depend on one another,
instead of submitting jobs that take a long time to complete relative to other jobs in the system.
작업 시스템은 일반적으로 여러 작업 의존 체인을 실행하므로 긴 작업을 여러 부분으로 나누면 여러 작업 체인이 진행될 수 있는 기회가 생깁니다.
The job system usually runs multiple chains of job dependencies, so if you break up long running tasks into multiple pieces there is a chance for multiple job chains to progress.
반면에 작업 시스템이 긴 작업으로 가득 차 있으면 완전히 모든 워커 쓰레드를 소비하고 독립적인 작업이 실행되지 못하게 할 수 있습니다.
If instead the job system is filled with long running jobs, they might completely consume all worker threads and block independent jobs from executing.
이는 메인 스레드가 명시적으로 기다리는 중요한 작업의 완료 시간을 밀어올려 메인 스레드에서 생기지 않았을 진행 지연을 일으킬 수 있습니다.
This might push out the completion time of important jobs that the main thread explicitly waits for, resulting in stalls on the main thread that otherwise wouldn’t exist.
특히, 긴 IJobParallelFor 작업은 작업 배치 크기에 대해 가능한 한 많은 워커 쓰레드에서 실행하려고 하기 때문에 작업 시스템에 부정적인 영향을 미칩니다.
In particular, long running IJobParallelFor jobs impact negatively on the job system
because these job types intentionally try to run on as many worker threads as possible for the job batch size.
긴 병렬 작업을 나눌 수 없는 경우 해당 작업을 예약할 때 배치 크기를 증가시켜 긴 작업을 수행하는 워커를 제한하는 것을 고려해보세요.
If you can’t break up long parallel jobs, consider increasing the batch size of your job when scheduling it to limit how many workers pick up the long running job.
MyParallelJob jobData = new MyParallelJob();
jobData.Data = someData;
jobData.Result = someArray;

/ 사용 가능한 워커 쓰레드의 절반을 사용하되, 최소 1개의 워커 쓰레드로 제한합니다
const int numBatches = Math.Max(1, JobsUtility.JobWorkerCount / 2);
const int totalItems = someArray.Length;
const int batchSize = totalItems / numBatches;

// 작업을 예약하고 결과 배열의 각 인덱스에 대해 하나의 Execute 및 batchSize 항목을 처리합니다
JobHandle handle = jobData.Schedule(result.Length, totalItems, batchSize);
추가 리소스 (Additional resources)
https://docs.unity3d.com/2023.3/Documentation/Manual/JobSystemJobDependencies.html
잡 의존성 (Job dependencies)
자주 하나의 작업이 다른 작업의 결과에 의존합니다.
Often, one job depends on the results of another job.
예를 들어, 작업 A는 NativeArray에 쓸 수 있고 작업 B는 그것을 입력으로 사용할 수 있습니다.
For example, Job A might write to a NativeArray that job B uses as input.
의존 작업을 예약할 때 이러한 종속성에 대해 작업 시스템에 알려야 합니다.
You must tell the job system about such a dependency when you schedule a dependent job.
작업 시스템은 종속 작업이 종료될 때까지 종속 작업을 실행하지 않습니다.
The job system won’t run the dependent job until the job it depends upon is finished.
하나의 작업은 여러 작업에 의존할 수 있습니다.
One job can depend on more than one job.
또한 각 작업이 이전 작업에 의존하는 작업 체인을 가질 수 있습니다.
You can also have a chain of jobs in which each job depends on the previous one.
그러나 의존성은 작업 실행을 지연시킵니다. 작업이 실행되기 전에 해당 작업의 모든 의존성이 완료되어야 하기 때문입니다.
However, dependencies delay job execution because you must wait for any dependencies of a job to complete before it can run.
의존 작업을 완료하려면 먼저 해당 작업이 의존하는 작업 및 해당 작업이 의존하는 모든 작업을 완료해야 합니다.
Completing a dependent job must first complete any job it depends on, and any jobs those jobs depend on.
작업의 Schedule 메서드를 호출하면 JobHandle이 반환됩니다.
When you call the Schedule method of a job it returns a JobHandle.
JobHandle을 다른 작업의 종속성으로 사용할 수 있습니다.
You can use a JobHandle as a dependency for other jobs.
작업이 다른 작업의 결과에 의존해야 하는 경우 첫 번째 작업의 JobHandle을 두 번째 작업의 Schedule 메서드에 매개변수로 전달할 수 있습니다.
If a job depends on the results of another job, you can pass the first job’s JobHandle as a parameter to the second job’s Schedule method, like so:
JobHandle firstJobHandle = firstJob.Schedule();
secondJob.Schedule(firstJobHandle);
종속성 결합 (Combining dependencies)
작업이 많은 종속성을 가지고 있다면 JobHandle.CombineDependencies 메서드를 사용하여 이를 병합할 수 있습니다.
If a job has a lot of dependencies, you can use the method JobHandle.CombineDependencies to merge them.
CombineDependencies 를 사용하면 종속성을 Schedule 메서드로 전달할 수 있습니다.CombineDependencies allows you to pass dependencies onto the Schedule method.
NativeArray<JobHandle> handles = new NativeArray<JobHandle>(numJobs, Allocator.TempJob);

// Populate `handles` with `JobHandles` from multiple scheduled jobs...

JobHandle jh = JobHandle.CombineDependencies(handles);
다중 작업 및 종속성 예제 (An example of multiple jobs and dependencies)
다음은 여러 작업이 여러 종속성을 가진 예제입니다.
The following is an example of multiple jobs that have multiple dependencies.
작업 코드(MyJob 및 AddOneJob)를 Update 및 LateUpdate 코드와 별도의 파일에 두는 것이 좋지만 명확성을 위해 이 예제는 하나의 파일에 포함되어 있습니다.
It’s best practice to put the job code (MyJob and AddOneJob) in a separate file to the Update and LateUpdate code, but for the purposes of clarity, this example is one file:
using UnityEngine;
using Unity.Collections;
using Unity.Jobs;

public class MyDependentJob : MonoBehaviour
{
    // 결과를 저장할 하나의 float를 담는 NativeArray 생성. 이 예제는 작업이 완료될 때까지 기다립니다.
    NativeArray<float> result;
    // 결과에 액세스하기 위한 JobHandle 생성
    JobHandle secondHandle;

    // 첫 번째 작업 설정
    public struct MyJob : IJob
    {
        public float a;
        public float b;
        public NativeArray<float> result;

        public void Execute()
        {
            result[0] = a + b;
        }
    }

    // 값에 1을 더하는 두 번째 작업 설정
    public struct AddOneJob : IJob
    {
        public NativeArray<float> result;

        public void Execute()
        {
            result[0] = result[0] + 1;
        }
    }

    // 매 프레임마다 호출되는 업데이트 메서드
    void Update()
    {
        // 첫 번째 작업에 대한 작업 데이터 설정
        result = new NativeArray<float>(1, Allocator.TempJob);

        MyJob jobData = new MyJob
        {
            a = 10,
            b = 10,
            result = result
        };

        // 첫 번째 작업 예약
        JobHandle firstHandle = jobData.Schedule();

        // 두 번째 작업에 대한 데이터 설정
        AddOneJob incJobData = new AddOneJob
        {
            result = result
        };

        // 두 번째 작업 예약
        secondHandle = incJobData.Schedule(firstHandle);
    }

    private void LateUpdate()
    {
        // 프레임 내 나중에 작업이 완료될 때까지 대기
        secondHandle.Complete();

        // NativeArray의 모든 복사본이 동일한 메모리를 가리키므로 "당신의" NativeArray 복사본에서 결과에 액세스할 수 있습니다.
        // float aPlusBPlusOne = result[0];

        // 결과 배열이 할당한 메모리 해제
        result.Dispose();
    }
}
https://docs.unity3d.com/2023.3/Documentation/Manual/JobSystemParallelForJobs.html
병렬 작업 (Parallel jobs)
schedule a job 할 때는 한 번에 하나의 작업만이 특정 작업을 수행할 수 있습니다.
When you schedule a job there can only be one job doing one task.
그러나 많은 객체에서 동일한 작업을 수행해야 하는 경우가 있습니다.
However, there will be times where you need to perform the same operation on a lot of objects.
이런 경우에는 IJobParallelFor에서 파생된 ParallelFor 작업 유형을 사용합니다.
To do this, use a ParallelFor job type, which inherits from IJobParallelFor.
ParallelFor 작업은 데이터 원본으로 NativeArray를 사용합니다. ParallelFor 작업은 여러 CPU 코어에서 실행됩니다.
A ParallelFor job uses a NativeArray of data to act on as its data source. ParallelFor jobs run across multiple CPU cores.
각 코어 당 하나의 작업이 있으며 각 작업은 작업 부하의 일부를 처리합니다.
There’s one job per core, with each handling a subset of the workload.
IJobParallelFor는 IJob과 유사하지만 단일 Execute 메서드 대신 데이터 원본의 각 항목당 한 번씩 Execute 메서드를 호출합니다.IJobParallelFor behaves like IJob, but instead of a single Execute method, it invokes the Execute method once per item in the data source.
Execute 메서드에는 데이터 소스 내의 단일 요소에 액세스하고 작업을 수행할 수 있는 정수 매개변수 index도 있습니다.
There’s also an integer parameter index in the Execute method, which you can use to access and operate on a single element of the data source within the job implementation.
다음은 ParallelFor 작업 정의의 예시입니다 :
The following is an example of a ParallelFor job definition:
struct IncrementByDeltaTimeJob: IJobParallelFor
{
    public NativeArray<float> values;
    public float deltaTime;

    public void Execute (int index)
    {
        float temp = values[index];
        temp += deltaTime;
        values[index] = temp;
    }
}
ParallelFor 작업 예약 (Schedule a ParallelFor job)
ParallelFor 작업을 예약하려면 사용할 NativeArray 데이터 소스의 길이를 지정해야 합니다.
To schedule a ParallelFor job, you must specify the length of the NativeArray data source that you want to split.
구조체에 여러 개가 있을 경우 데이터 소스로 사용할 NativeArray를 작업 시스템이 알 수 없습니다..
The job system doesn’t know which NativeArray you want to use as the data source if there are several in the struct.
길이는 또한 작업 시스템에게 기대할 Execute 메서드의 수를 알려줍니다.
The length also tells the job system how many Execute methods to expect.
In Unity’s native code, the scheduling of ParallelFor jobs is more complicated.
유니티의 네이티브 코드에서 ParallelFor 작업을 예약하는 것은 더 복잡합니다.
유니티가 ParallelFor 작업을 예약하면 작업 시스템은 작업을 코어 간에 분배하기 위해 작업을 일련의 배치로 나눕니다.
When Unity schedules a ParallelFor job, the job system divides the work into batches to distribute between cores.
각 배치에는 Execute 메서드의 하위 집합이 포함되어 있습니다.
Each batch contains a subset of Execute methods.
그런 다음 job system은 유니티의 네이티브 작업 시스템에서 CPU 코어 당 하나의 작업을 예약하고 해당 네이티브 작업을 배치에 전달하여 완료합니다.
The job system then schedules one job in Unity’s native job system per CPU core and passes that native job to the batches to complete.
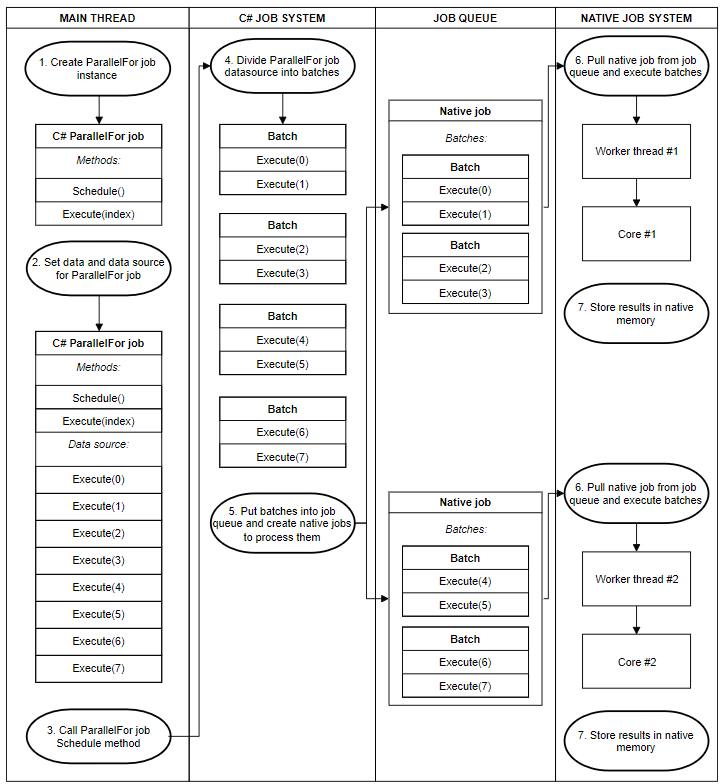
A ParallelFor job dividing batches across cores
다른 Native 작업보다 네이티브 작업이 일부 배치를 먼저 완료하면 남은 배치를 다른 네이티브 작업에서 빼앗아 갑니다.
When a native job completes its batches before others, it steals remaining batches from the other native jobs.
이 때 캐시 지역성을 보장하기 위해 네이티브 작업의 남은 배치의 절반만을 한 번에 빼앗습니다.
It only steals half of a native job’s remaining batches at a time, to ensure cache locality.
이 프로세스를 최적화하려면 배치 카운트를 지정해야 합니다.
To optimize the process, you need to specify a batch count.
배치 카운트는 얼마나 많은 작업을 얻을지 및 스레드 간 작업 재분배가 얼마나 미세한지를 제어합니다.
The batch count controls how many jobs you get, and how fine-grained the redistribution of work between threads is.
낮은 배치 카운트(예: 1)는 스레드 간 작업을 균등하게 분배합니다.
Having a low batch count, such as 1, gives you an even distribution of work between threads.
그러나 이에는 어느 정도의 오버헤드가 따르므로 때로는 배치 수를 늘리는 것이 더 나을 수 있습니다.
However, it comes with some overhead, so sometimes it’s better to increase the batch count.
1에서 시작하여 성능 향상이 미미할 때까지 배치 수를 늘리는 것이 좋은 전략입니다.
Starting at 1 and increasing the batch count until there are negligible performance gains is a good strategy.
다음은 ParallelFor 작업을 예약하는 예시입니다.
The following is an example of scheduling a ParallelFor job
Job code:
// Job adding two floating point values together
public struct MyParallelJob : IJobParallelFor
{
    [ReadOnly]
    public NativeArray<float> a;
    [ReadOnly]
    public NativeArray<float> b;
    public NativeArray<float> result;

    public void Execute(int i)
    {
        result[i] = a[i] + b[i];
    }
}
Main thread code:
NativeArray<float> a = new NativeArray<float>(2, Allocator.TempJob);

NativeArray<float> b = new NativeArray<float>(2, Allocator.TempJob);

NativeArray<float> result = new NativeArray<float>(2, Allocator.TempJob);

a[0] = 1.1;
b[0] = 2.2;
a[1] = 3.3;
b[1] = 4.4;

MyParallelJob jobData = new MyParallelJob();
jobData.a = a;
jobData.b = b;
jobData.result = result;

// 결과 배열의 각 인덱스에 대해 하나의 Execute로 작업을 예약하고 각 처리 배치당 항목은 1개
JobHandle handle = jobData.Schedule(result.Length, 1);

// 작업이 완료될 때까지 기다립니다.
handle.Complete();

// 배열에 할당된 메모리를 해제합니다.
a.Dispose();
b.Dispose();
result.Dispose();
ParallelForTransform jobs
ParallelForTransform 작업은 Transforms에 특화된 또 다른 ParallelFor 작업 유형입니다.
A ParallelForTransform job is another type of ParallelFor job designed specifically for operating on Transforms.
이는 작업에서 Transform 작업을 효율적으로 수행하는 데 유용합니다.
It’s useful for working on Transform operations from jobs efficiently.
더 많은 정보는 ParallelForTransform API 문서를 참조하세요.
For more information, see the ParallelForTransform API documentation.
https://docs.unity3d.com/2023.3/Documentation/ScriptReference/Jobs.IJobParallelForTransform.html
IJobParallelForTransform
interface in UnityEngine.Jobs
Job에 전달된 모든 변환의 위치, 회전 및 크기에 대해 동일한 독립적인 작업을 수행할 수 있도록 하는 인터페이스입니다.
An interface that allows you to perform the same independent operation for each position, rotation and scale of all the transforms passed into a job.
using UnityEngine;
using Unity.Collections;
using Unity.Jobs;
using UnityEngine.Jobs;

class ApplyVelocitySample : MonoBehaviour
{
    public struct VelocityJob : IJobParallelForTransform
    {
        // 작업에서 액세스될 모든 데이터를 선언합니다.
        // 읽기 전용으로 선언함으로써 여러 작업에서 데이터에 병렬로 액세스할 수 있습니다.
        [ReadOnly]
        public NativeArray<Vector3> velocity;

        // 작업에서 프레임 개념이 일반적으로 없기 때문에 델타 타임을 작업으로 복사해야 합니다.
        // 메인 스레드는 동일한 프레임이나 다음 프레임에 작업을 기다리지만,
        // 작업은 작업자 스레드에서 실행되는 시점에 상관없이 작업을 결정적으로 수행해야 합니다.
        public float deltaTime;

        // 작업에서 실제로 실행되는 코드
        public void Execute(int index, TransformAccess transform)
        {
            // 델타 타임과 속도를 기반으로 변환을 이동시킵니다.
            var pos = transform.position;
            pos += velocity[index] * deltaTime;
            transform.position = pos;
        }
    }

    // 작업에서 조작할 변환을 인스펙터에서 할당합니다.
    [SerializeField] public Transform[] m_Transforms;
    TransformAccessArray m_AccessArray;

    void Awake()
    {
        // 변환을 TransformAccessArray 인스턴스에 저장하여 작업에서 액세스할 수 있도록 합니다.
        m_AccessArray = new TransformAccessArray(m_Transforms);
    }

    void OnDestroy()
    {
        // TransformAccessArrays는 수동으로 Dispose해야 합니다.
        m_AccessArray.Dispose();
    }

    public void Update()
    {
        var velocity = new NativeArray<Vector3>(m_Transforms.Length, Allocator.Persistent);

        for (var i = 0; i < velocity.Length; ++i)
            velocity[i] = new Vector3(0f, 10f, 0f);

        // 작업 데이터 초기화
        var job = new VelocityJob()
        {
            deltaTime = Time.deltaTime,
            velocity = velocity
        };

        // 병렬로 변환 작업을 예약합니다.
        // 이 메서드는 작업에서 조작할 변환을 포함하는 TransformAccessArray를 취합니다.
        JobHandle jobHandle = job.Schedule(m_AccessArray);

        // 작업이 완료되었는지 확인합니다.
        // 작업을 즉시 완료하면 이와 병렬로 다른 작업이 실행될 가능성이 감소합니다.
        // 작업을 프레임 초반에 예약하고 나중에 프레임에서 기다리는 것이 좋습니다.
        jobHandle.Complete();

        Debug.Log(m_Transforms[0].position);

        // Native 배열은 수동으로 Dispose해야 합니다.
        velocity.Dispose();
    }
}

핑백: DOTS 정리 (2) - Unity Job 시스템 시작하기 - 어제와 내일의 나 그 사이의 이야기